Page 10 of 21
Re: Chris' 200 20v Avant - RENNWGN
Posted: Sat Aug 08, 2015 3:40 pm
by loxxrider
Oh, and I'll get the new hardware too

Now I'm debating on what crank cog I'm going to use. I will make a separate post about that. There are a lot of intricacies to that little thing!
Re: Chris' 200 20v Avant - RENNWGN
Posted: Sat Aug 08, 2015 4:57 pm
by yodasfro
Re: Chris' 200 20v Avant - RENNWGN
Posted: Sat Aug 08, 2015 7:05 pm
by loxxrider
That's actually the one Jeff Gerner recommended when I talked to him about this today. Its one of the only ones around with the correct tooth profile.
Re: Chris' 200 20v Avant - RENNWGN
Posted: Sun Aug 09, 2015 10:35 am
by loxxrider
OK, I think I'm pretty much all set here. I've figured out almost all the parts I need to order with the exception of one or two.
For the crank cog, I've narrowed it down significantly. The one Austin mentioned last is probably the best out there in terms of construction, cost, etc. However, I had some of my own hardened cogs made. The only problem with them is that the tooth valleys are a little different than stock. I have one which has been modified for dry sump use on the revver, but I'm starting to think I want to use that one Austin mentioned on that car... just in case...
No big deal to have the machining done to a new cog again, and then I can use the old cog on this car to prove it in a stock/slightly modified application (and I can easily prove belt wear/longevity on this car with that cog). Discussion of this cog and tooth design will be in another thread.
I'm pretty sure that should be the plan here. Then I can prove my part and save some money in the process.
However, now I can't figure out what cam gear to go with. You guys have slightly scared me away from using a new stock one (even though I'm about 99.99% positive it wont be a problem with a properly-intalled new one. There are a few of these gears out there. I have used an Autotech one and still have it floating around. That would seem to be the logical choice... however, I could sell it and use something else. I have seen one made by CAT. I feel like that should be a quality piece, but I'm a little concerned about the tooth profile on all of these cam gears. I'm not sure which are true "super torque" (rounded edges on the teeth instead of squared-off) profiles and which aren't. Other options are Tommi's Billet (not sure how I feel about their quality these days after some of Nick and Jeff's findings as well as Kevin D's), Dahlback, and more. Here is a link to the cat one. Doesn't look anything like the others! I'm skeptical about fitment of that on our engines because I've never seen one used before, but 034s website says it should.
http://store.034motorsport.com/cam-gear-adj-w-pin-16v-20v-and-058-aeb.htmlAssuming I do use one of these cam gears, I really need to have a cam gear cover since I use the car offroad nearly every time I drive it. EFIexpress has a carbon fiber cover which is extended for use with aftermarket cam gears. Cool eh? There is also a Dahlback one which is stock width apparently, so that is an option too.
Thoughts please!
Re: Chris' 200 20v Avant - RENNWGN
Posted: Sun Aug 09, 2015 11:08 am
by audifreakjim
That's the one I used and I loved it. The alignment pin works great and takes the guesswork out of it. I am honestly not sure how people use the other style with the little markings.
Re: Chris' 200 20v Avant - RENNWGN
Posted: Sun Aug 09, 2015 12:34 pm
by loxxrider
Good to know! Can you by chance take a close-up (non-blurry) picture of the teeth on it? If you still have it that is.
Re: Chris' 200 20v Avant - RENNWGN
Posted: Sun Aug 09, 2015 1:02 pm
by 85oceanic
loxxrider wrote:85oceanic wrote:I do believe you can convert the old control head to the B5 A4 style which would be really nice. Seriously Chris, I love this car, it's going to make a SIICK daily. Also, that gauge site is AWeSOME! I believe I'm going to have to use it at some point in time.

Is there information about this somewhere?
I will see what I can dig up.
Re: Chris' 200 20v Avant - RENNWGN
Posted: Sun Aug 09, 2015 10:03 pm
by audifreakjim
I don't have it anymore, but it was definitely super torque. It had about 35k miles on it and the belt still looked great so I would not be worried about it having the wrong pattern.
Re: Chris' 200 20v Avant - RENNWGN
Posted: Tue Aug 11, 2015 9:04 pm
by loxxrider
- Screenshot_2015-08-11-21-58-54.jpg (2.54 MiB) Viewed 31487 times
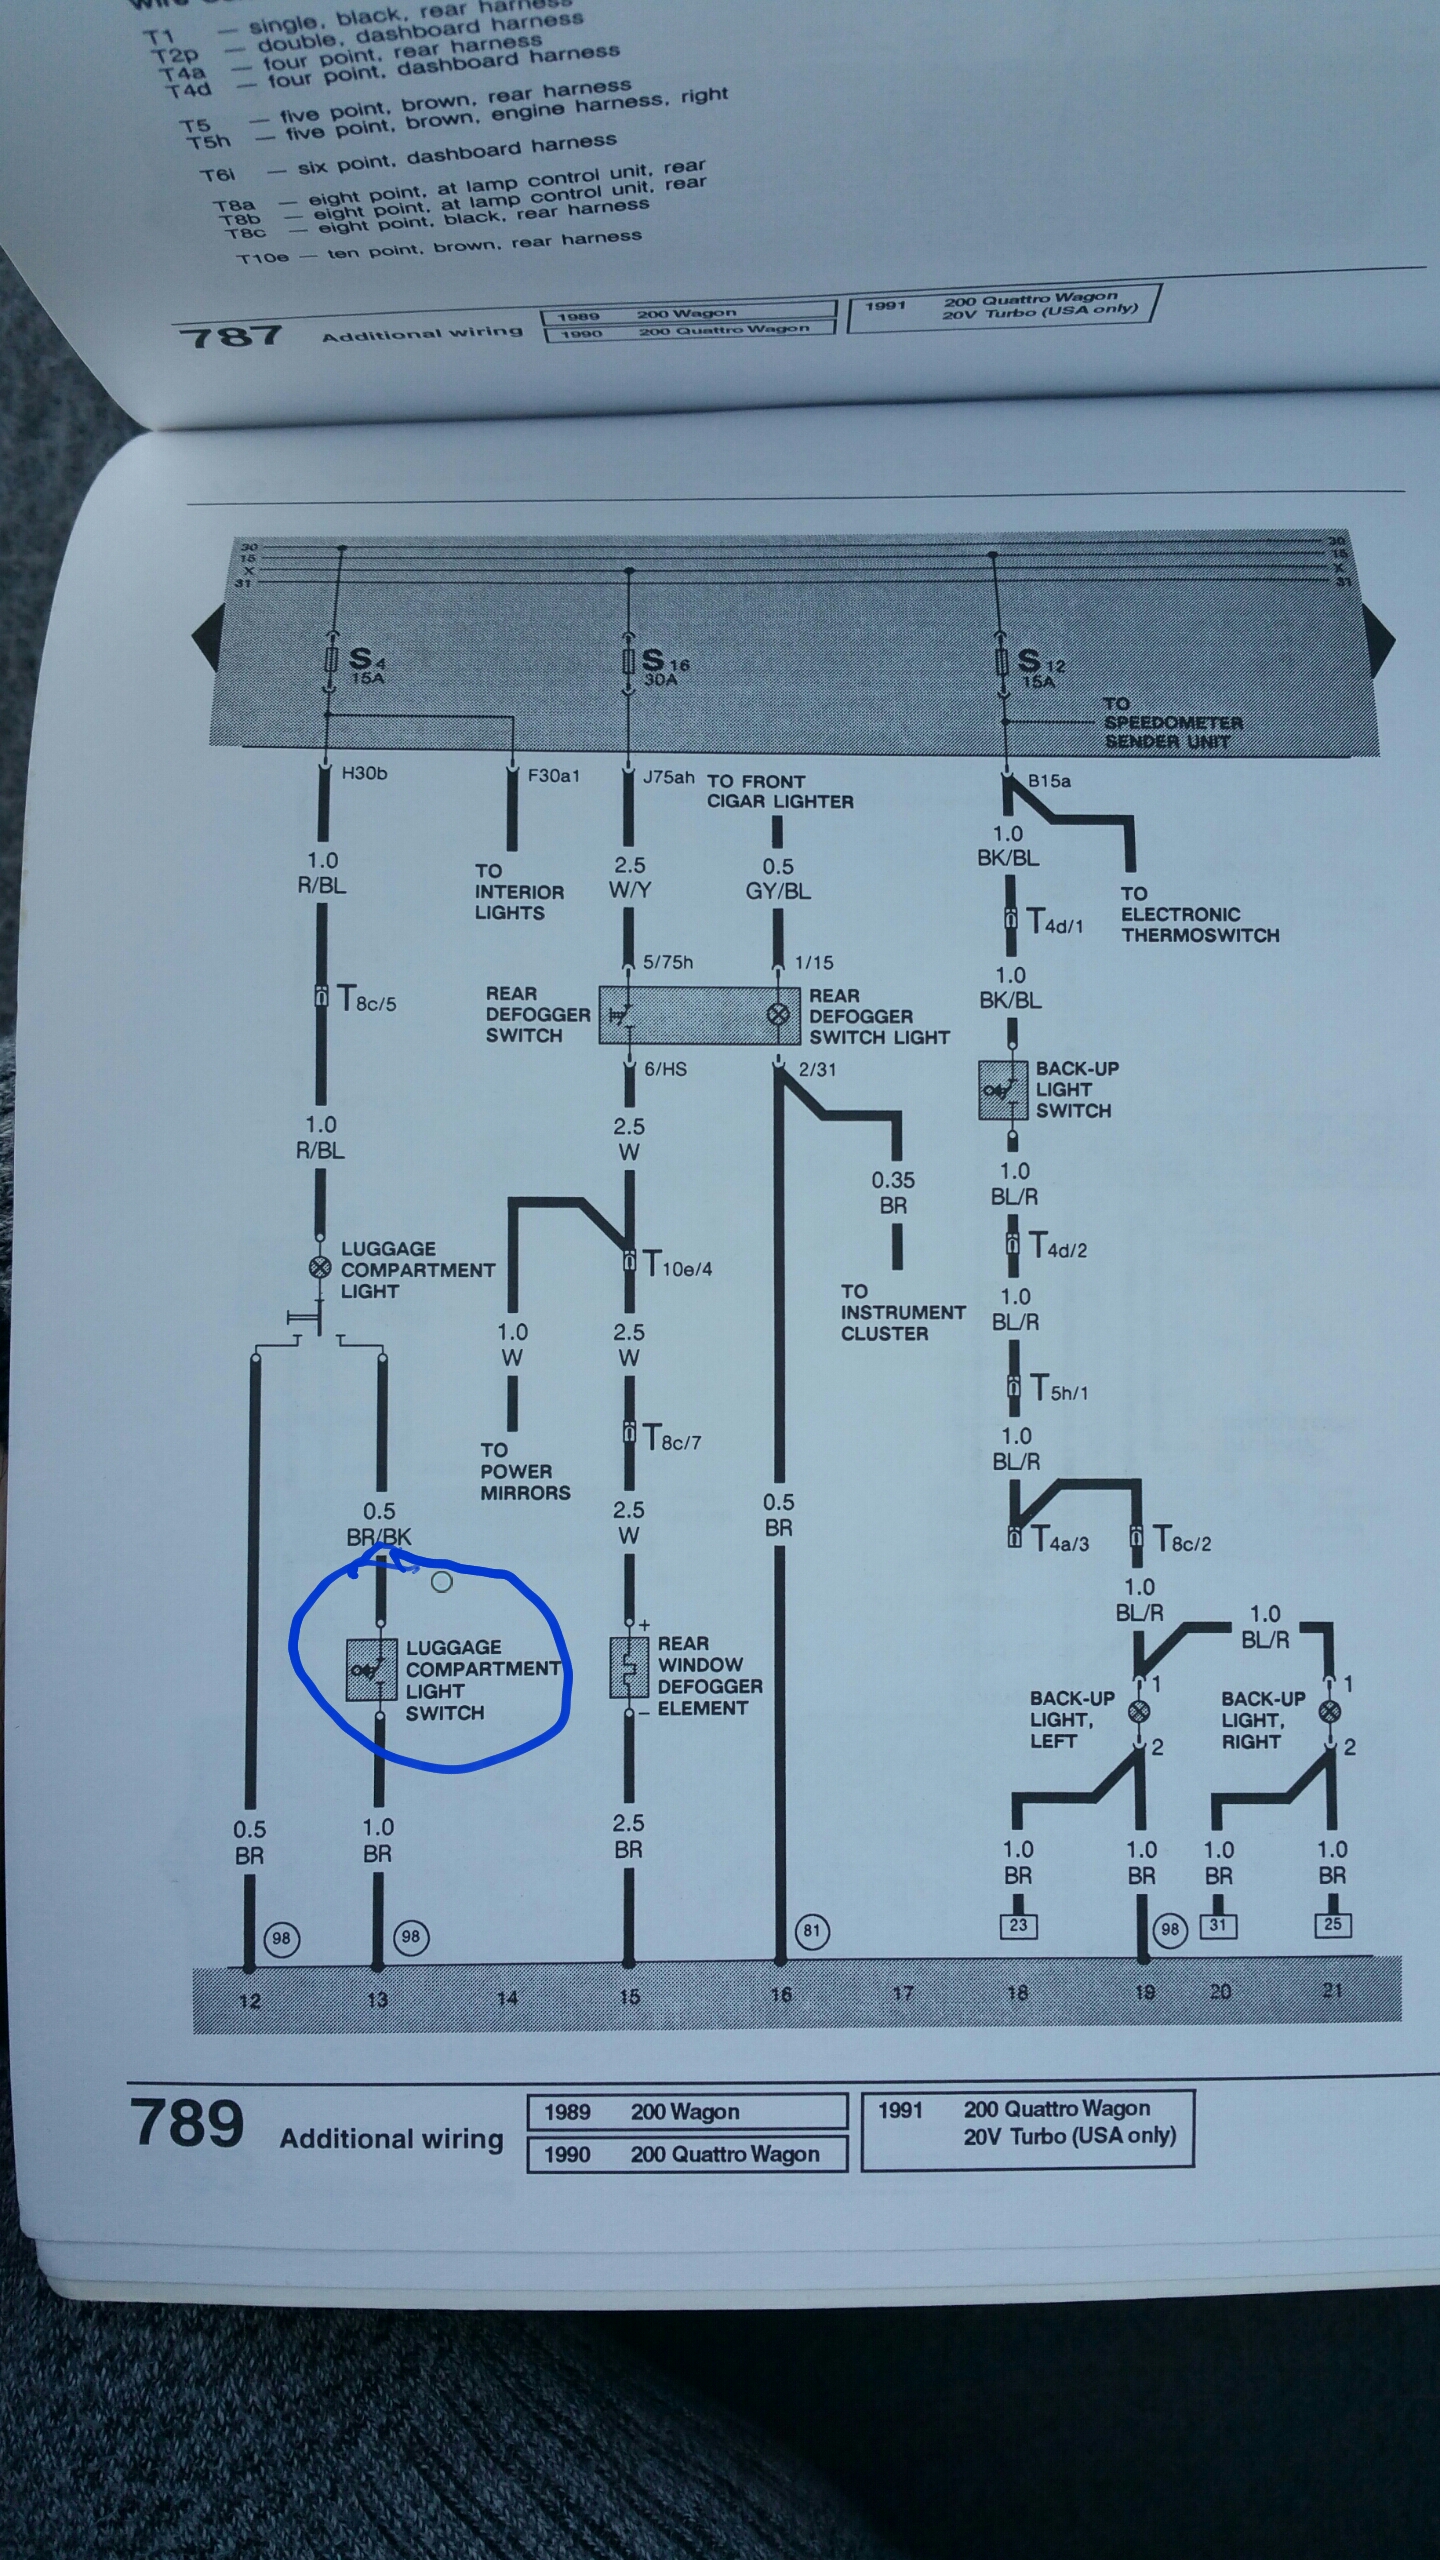
Can anyone tell me where this switch is located?
My luggage compartment light only works with the wire that goes straight to ground. The black/brown wire doesn't do anything. The wiring diagram makes it seem like there is a separate switch in addition to the one that the light is on. How is the luggage compartment light supposed to operate? Does it come on when the latch is released or something?
Here's the back of the switch the light is attached to.
Re: Chris' 200 20v Avant - RENNWGN
Posted: Wed Aug 12, 2015 7:56 am
by loxxrider
Apparently other people have wondered the same thing... does anyone have a luggage compartment light which comes on when you open the hatch? I'm thinking it is integrated into the latch somehow. Can't find any documentation on this though. Not in the Bentley or parts diagrams anywhere.
http://forums.quattroworld.com/v8/msgs/13464.phtml*Edit* FOUNT IT!
Number 19 in the diagram below. Part number 443947561C. I will order a new switch and hope that fixes it. If not, then wiring is next.
Re: Chris' 200 20v Avant - RENNWGN
Posted: Wed Aug 12, 2015 10:41 am
by PRY4SNO
Wictory!
Re: Chris' 200 20v Avant - RENNWGN
Posted: Wed Aug 12, 2015 11:55 am
by loxxrider
I'm on a posting binge, I know. Hopefully you guys enjoy even the small improvements. If not, well that's too bad because it serves as record-keeping for me!
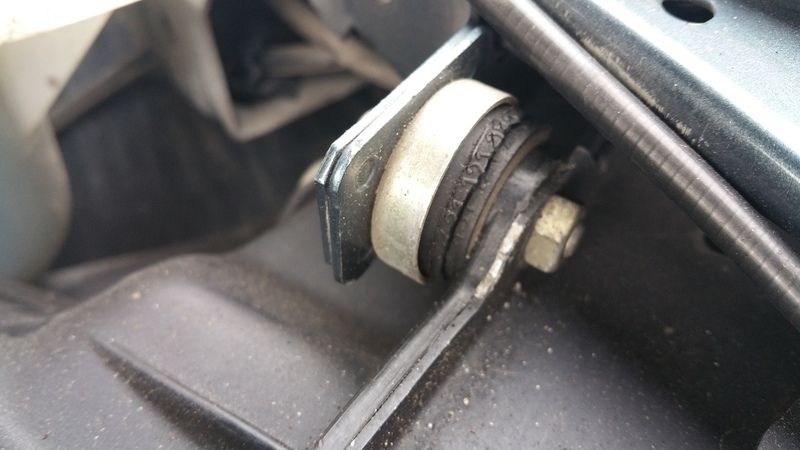
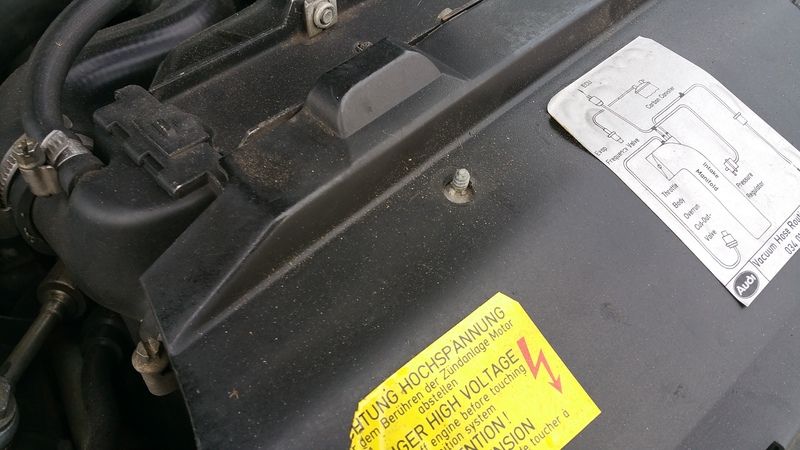
I was bored the other night and did a bit of an inspection in the engine bay. Here is what I found.
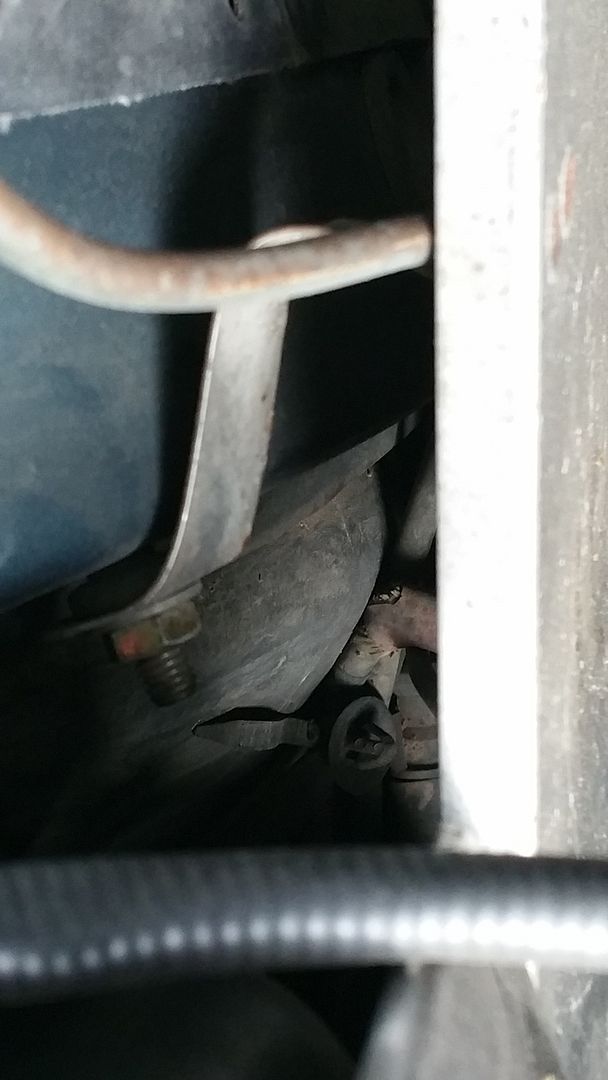
Broken radiator mount. I am ordering six of these (4 for the aux radiator for when the timing belt gets done). P/N 443121273E
The plastic nut for my fan shroud is gone. This is me being picky, but why not replace it when it's available? P/N 171201969
The wiring for the washer system and hood light is missing a grommet where it passes through the rain tray. P/N 171971913
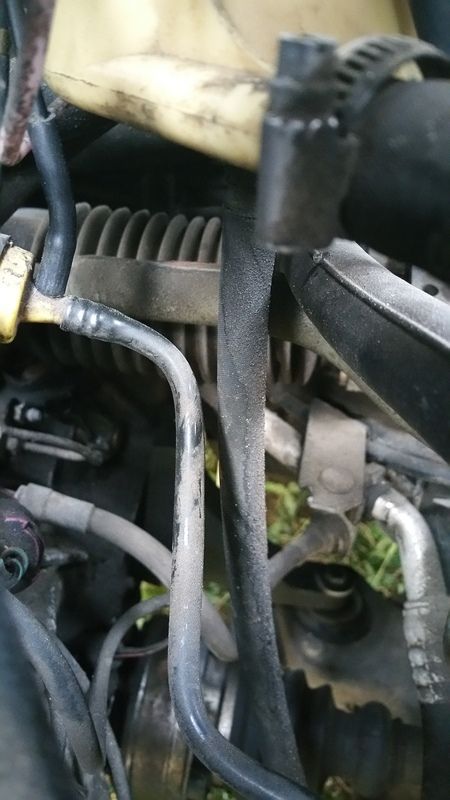
The steering damper is all oily... I can't see anything around it that could be causing that, so I believe it is probably bad. My records show that it was replaced at some point, but I'm not sure exactly when. I think it is at least 10 years old and 70k+ miles old, so why not replace it! P/N 4A0425021 (this is the only one I can find when searching in the parts stores online anyway... the Audi replacement is very expensive at over $200... Febi makes one for around $50).
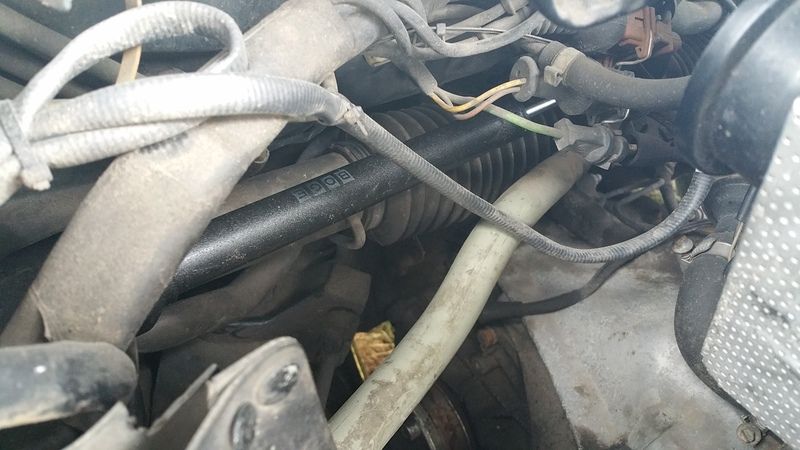
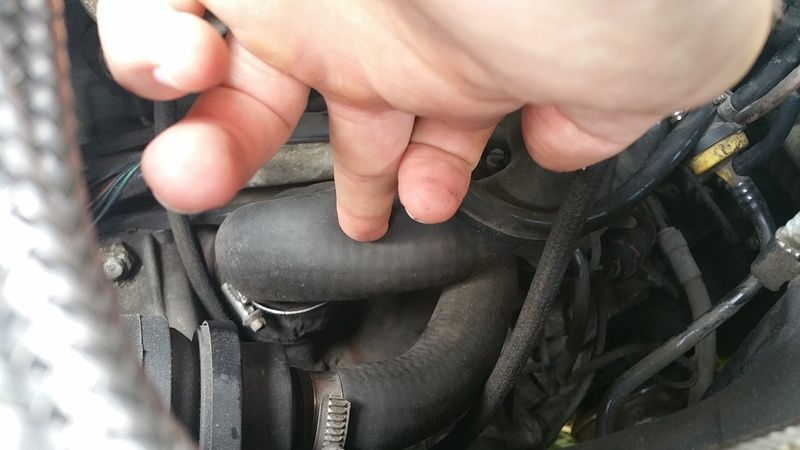
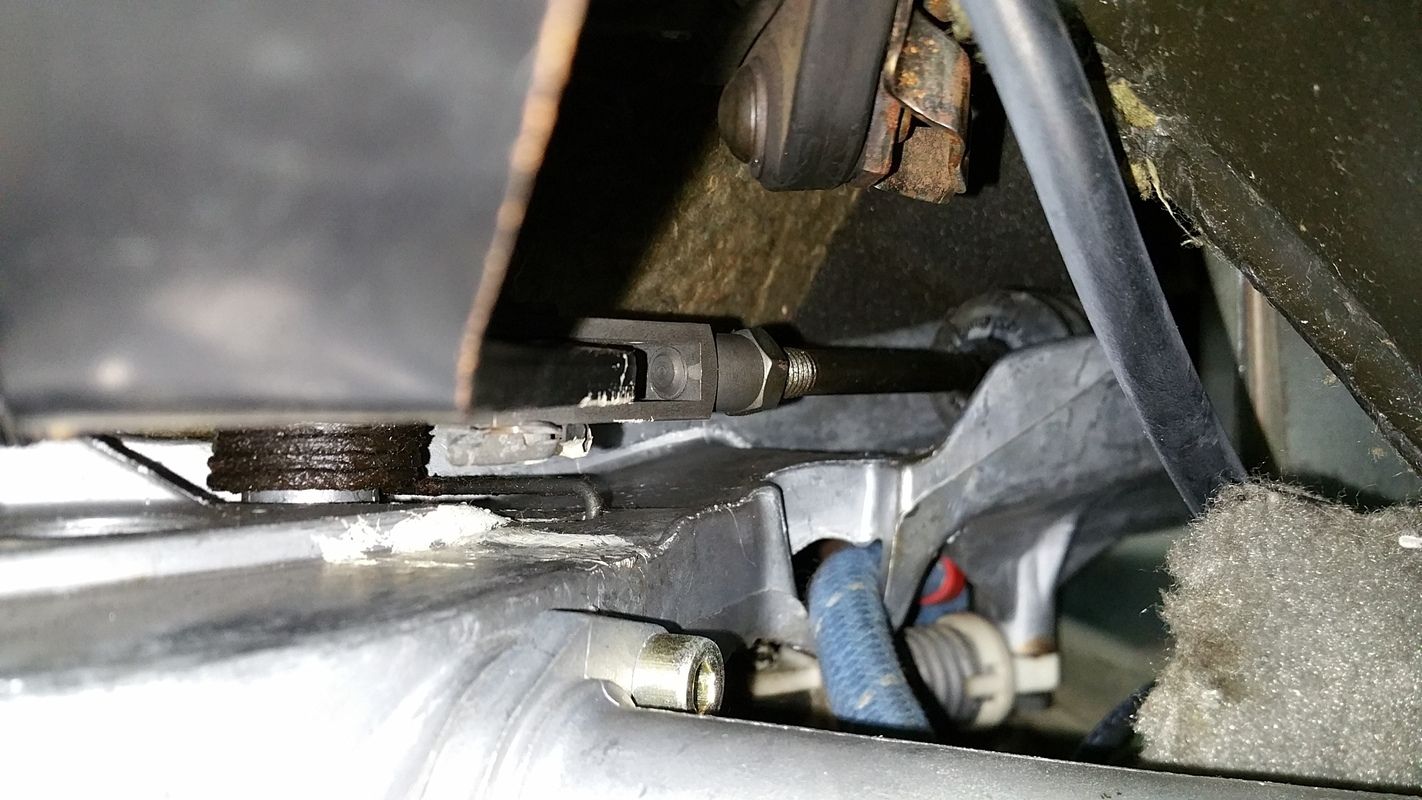
There is a steering hose which has some Pentosin leaked onto it, but I think it is from the smaller diameter hose right above it. P/N 443422891B
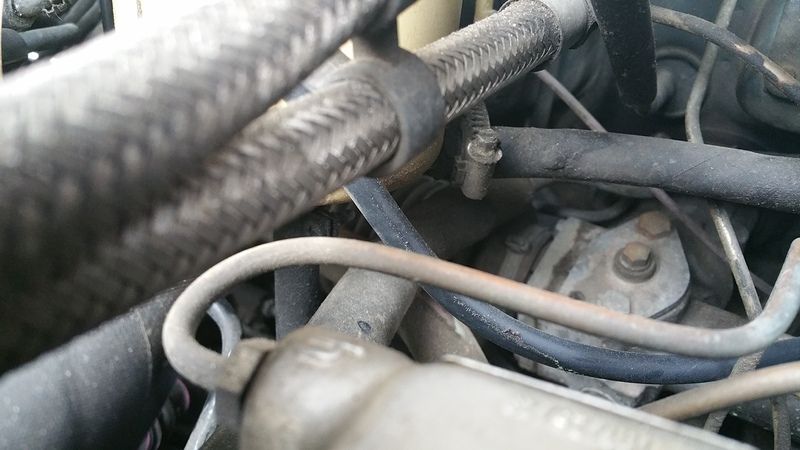
This appears to be the culprit. 443422891B
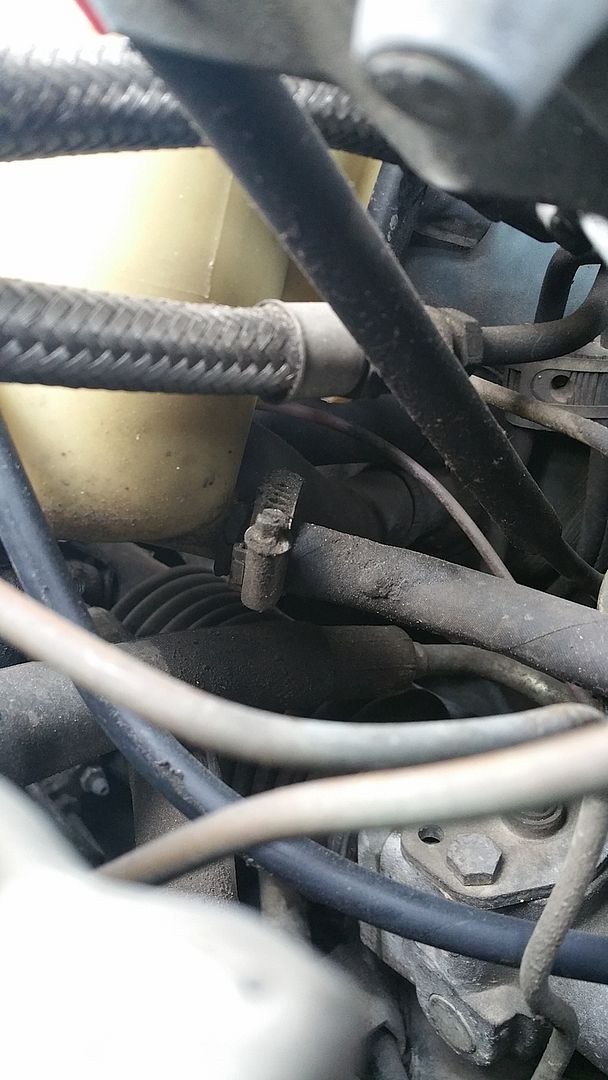
The bottom hose on the hydraulic fluid reservoir is also leaking. I will replace that hose as well. P/N 443612733C. It isn't a special hose (just regular hydraulic hose with hose clamps on it). Size 8X14
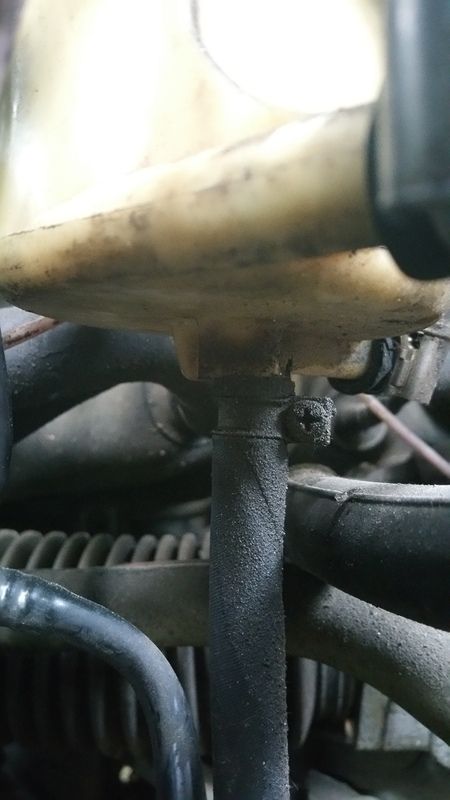
My crank breather is VERY soft. I almost feel like I could push my finger through it lol. It doesn't leak for now though. I will order the kit from 034 to replace it all with silicone.
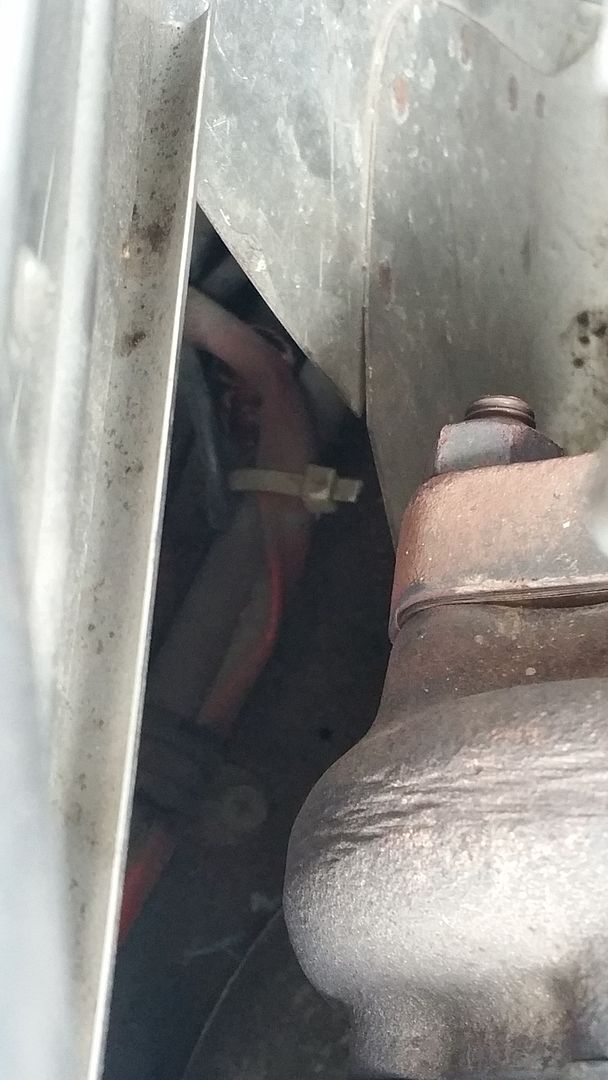
This one is particularly interesting to me because it seems like it could be a big deal actually. There is a medium-sized red wire which splits off near the turbo and goes down near the passenger fender. It seems frayed and possibly damaged here as you can (barely) see in the pictures. Maybe that's just the jacket and the wire is just fine. I'm going to work on figuring out what that goes to before it becomes a problem though!
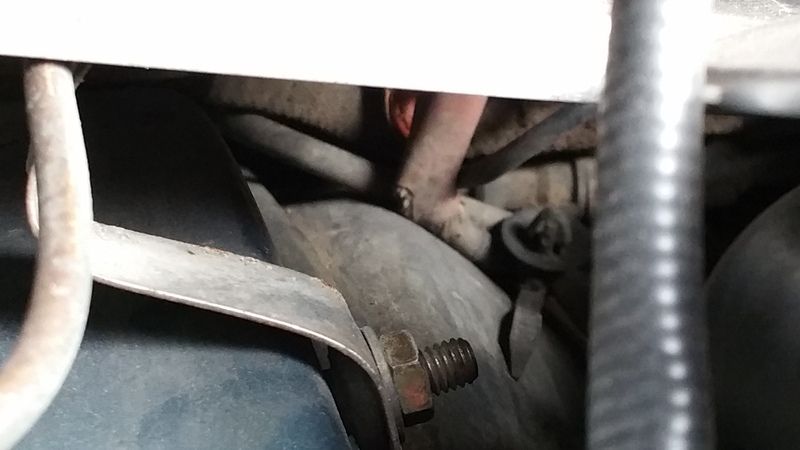

Finally, there is a funky noise that comes from the brake pedal. It is pretty strange because you can depress the brake pedal very lightly and a loud tap comes from the brake master or maybe the hydro assist area. It seems to mostly go away after the brakes are pumped up a bit. I'm thinking maybe I need to adjust this rod? If that doesn't help, I will start looking at the hydro assist unit and master.
Re: Chris' 200 20v Avant - RENNWGN
Posted: Wed Aug 12, 2015 12:25 pm
by jretal
Before you go too nuts on the brake pedal, pull the clevis pin and see if it's worn/slotted. I know it's happened on the older B2s, and it causes a click/pop. Hopefully the clevis itself isnt' worn!
Re: Chris' 200 20v Avant - RENNWGN
Posted: Wed Aug 12, 2015 1:21 pm
by DE80q
That is probably just the heat jacket on the wire fraying. I noticed that on most of the Audi's I have worked on.
Re: Chris' 200 20v Avant - RENNWGN
Posted: Wed Aug 12, 2015 2:31 pm
by PRY4SNO
I don't have the link handy but FunkWeasel's build thread on MG had a nifty upgrade for the steering dampener using a beefier Mercedes part which happened to be more cost effective (about the same as what you quoted). While I'm not certain, I'd imagine it would also be applicable on a T44. Worth a look anyways.
Re: Chris' 200 20v Avant - RENNWGN
Posted: Thu Aug 13, 2015 2:33 pm
by loxxrider
I will definitely check the clevis. I kinda did already, but need to take a closer look. That was my first thought actually, but it didn't "feel" like it was coming from there when I was messing with it from under the dash.
On the heat jacket, that's sort of what I suspected. Tha k you for reinforcing that. I will check with my bores cope when I get a chance just to be sure.
Good to know on the damper! Thanks, I will look into it. One thing I've been wondering is if that damper actually reduces steering feel... I know our cars aren't known for great feel, but in all honesty compared to almost everything modern, I think it has quite good feel! It's just that it understeer a lot so that's all you feel lol. Maybe I'll just leave the damper be for more feel :p
Re: Chris' 200 20v Avant - RENNWGN
Posted: Thu Aug 13, 2015 2:51 pm
by loxxrider
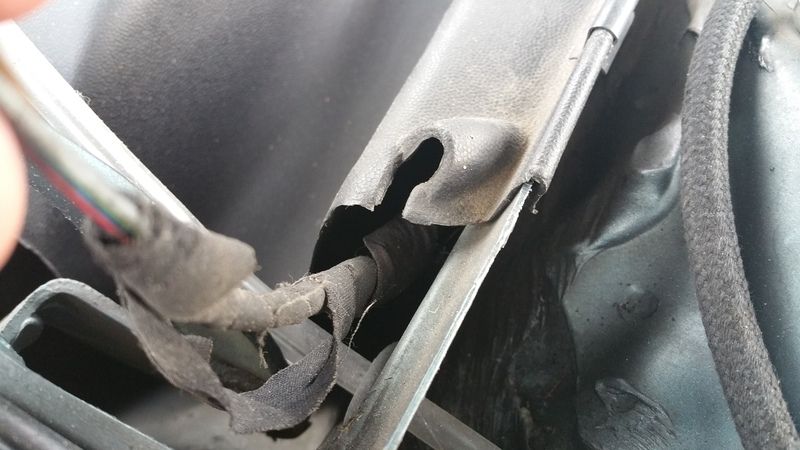
And we have progress!
I suspected this all along. I was able to get to the hatch latches easily yesterday. They come right out readily and the switch is so simple it really isn't worth even testing. So I took the wire in question off of it and grounded it straight to the chassis. No light. At that point, I had to face the fact that this was a wiring issue.
So I thought to myself, "If I were a wire, where would I break." Of course, the obvious answer is at the hatch hinges. Sure enough...
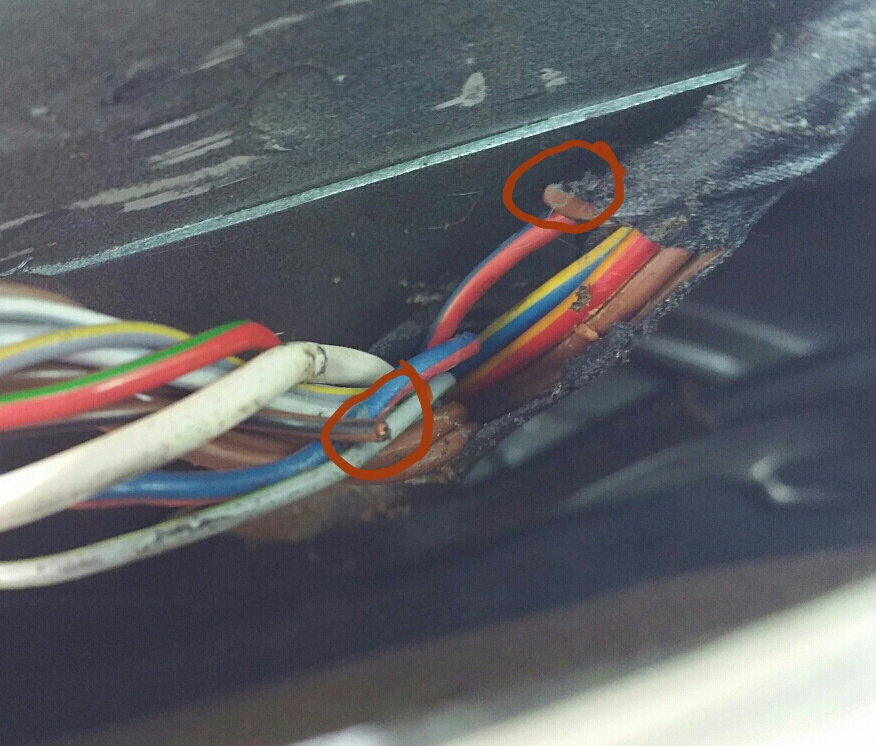
- Screenshot_2015-08-13-15-42-29-1.jpg (510.76 KiB) Viewed 31404 times
Almost all of the wires in that area and by the other hatch hinge have their insulation cracked and probably wires nearing failure from fatigue. Time to spend some time with the soldering iron and rebuild this part of the harness! Or get a new harness?
Re: Chris' 200 20v Avant - RENNWGN
Posted: Thu Aug 13, 2015 7:19 pm
by k2exoman
I rebuilt the hatch wiring completely on my UrS6 avant, took a couple hours tops...
I used some techflex, counted, gauged and labeled all the wires and then cut that section of the harness completely out. Soldered inside the main cabin and well into the hatch itself. Not sure if the harness itself is available.
Re: Chris' 200 20v Avant - RENNWGN
Posted: Thu Aug 13, 2015 7:23 pm
by loxxrider
Yeah, I agree cutting out a large section is important to make a repair like this last. At least one version of the harness is still available, altgough I could buy a mighty nice Metcal soldering thing for the price. I'm still trying to figure out if it's for a specific model or what...
Re: Chris' 200 20v Avant - RENNWGN
Posted: Mon Aug 17, 2015 7:33 am
by PRA4WX
loxxrider wrote:I will definitely check the clevis. I kinda did already, but need to take a closer look. That was my first thought actually, but it didn't "feel" like it was coming from there when I was messing with it from under the dash.
On the heat jacket, that's sort of what I suspected. Tha k you for reinforcing that. I will check with my bores cope when I get a chance just to be sure.
Good to know on the damper! Thanks, I will look into it. One thing I've been wondering is if that damper actually reduces steering feel... I know our cars aren't known for great feel, but in all honesty compared to almost everything modern, I think it has quite good feel! It's just that it understeer a lot so that's all you feel lol. Maybe I'll just leave the damper be for more feel :p
I delete the steering damper on my audi's. But be ready for more "active" steering!
Re: Chris' 200 20v Avant - RENNWGN
Posted: Tue Aug 18, 2015 7:05 pm
by loxxrider
Good to know. Thanks!
Just scored two brand new genuine vw/audi right rear window regs for $45 a piece. Hell yes!
Re: Chris' 200 20v Avant - RENNWGN
Posted: Tue Aug 18, 2015 8:37 pm
by 88a5tq
You didn't need the motors?
Re: Chris' 200 20v Avant - RENNWGN
Posted: Tue Aug 18, 2015 9:33 pm
by PRY4SNO
Just a thought, should be fine either way.
A ways back diagnosticator on AZ referenced a TSB that strictly recommended staggered crimped butt connections with heat shrink to cover versus soldered connections.
YMMV.
Re: Chris' 200 20v Avant - RENNWGN
Posted: Tue Aug 18, 2015 9:37 pm
by chaloux
I trust my dad with the electronics. He said soldering was completely unnecessary. Pick up your butt splices from an electrical supply store rather than home depot or whatever, and you'll be totally fine. Heat shrink if exposed or permanent.
Re: Chris' 200 20v Avant - RENNWGN
Posted: Tue Aug 18, 2015 10:17 pm
by alxdgr8
Better yet, get the marine butt splices that have the adhesive shrink wrap built-in!