Justin's '85 UrQ'd 4000 20vt Project - Tuning Help?
-
Quattro Krant
Quattro Krant wrote:[/quote]
Keep this thread updated as I too am going to be putting in a Torsen tranny in my 4kq over the winter. I'm not looking forward to splitting it open for the speed sensor but oh well[/quote]
Speed sensor is looking to be really easy. It just unthreads from the top, and then the gear *should* just pop out when you pull out the driver's side axle cup. I haven't tackled that yet b/c I need to put in an order for the axle seals, so haven't bothered dismantling either tranny yet.
Speed sensor is looking to be really easy. It just unthreads from the top, and then the gear *should* just pop out when you pull out the driver's side axle cup. I haven't tackled that yet b/c I need to put in an order for the axle seals, so haven't bothered dismantling either tranny yet.
-
Quattro Krant
Time for an update as another thing has been checked off the list... namely 200 20vt 016 Torsen Transmission is INSTALLED
Back in the summer, I was able to pick up a good used tranny from a guy up in Vermont for a decent deal... and he even delivered it to me to boot!!!
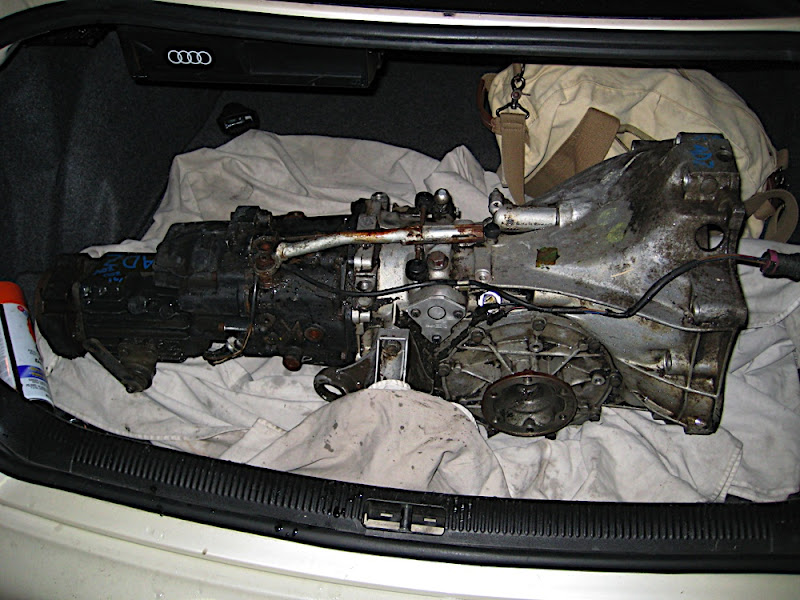
After having it sit in my garage for a few months, I figured it was time to start making some headway. To make life a lil cleaner for myself, I figured a trip to the carwash was in order to get the crazy amount of grease/grit/grime off... so a can of 'Gunk' and a can or two of carb cleaner later we had a much less greasy transmission... not spotless, but good enough to handle:
Before:
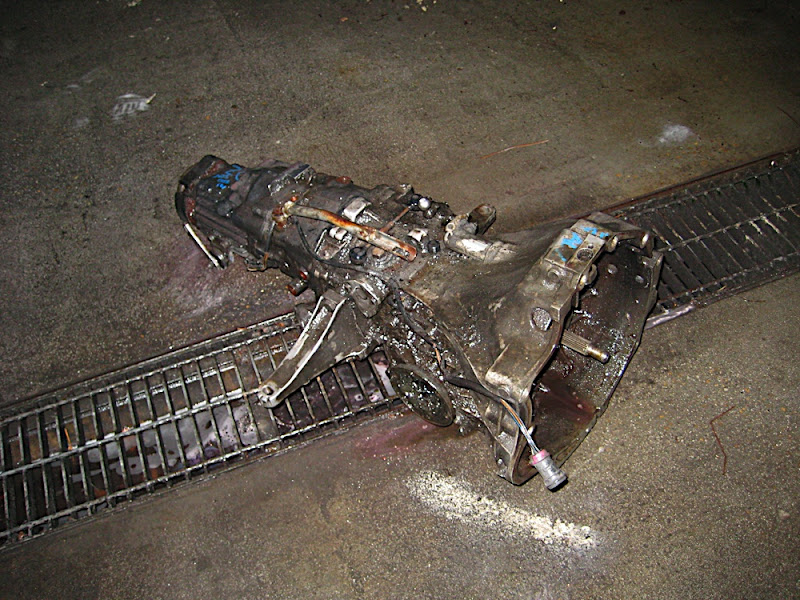
After:
After a bit more waiting, it was finally time to get the ball rolling and get this swap underway.
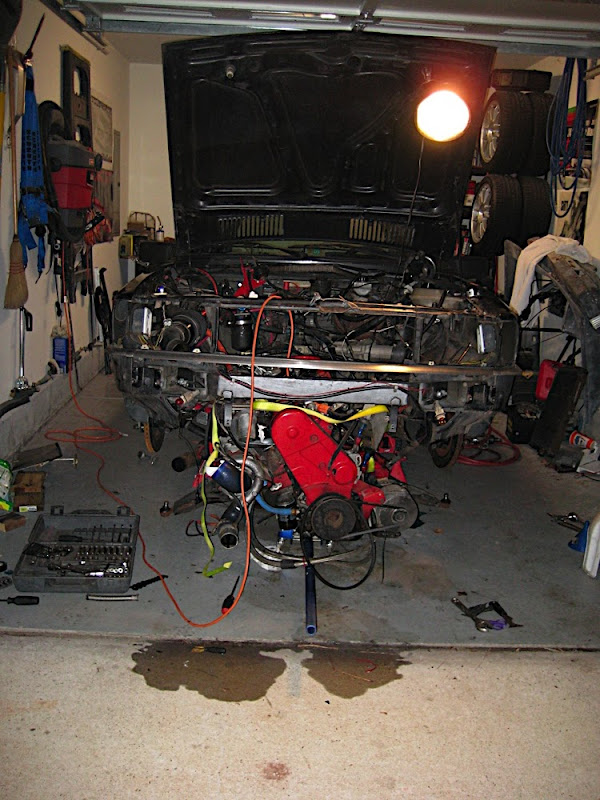
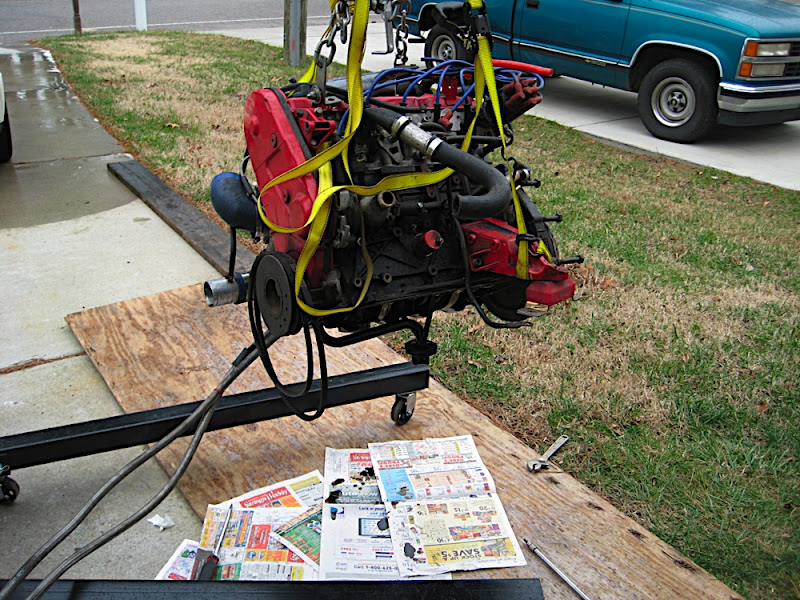
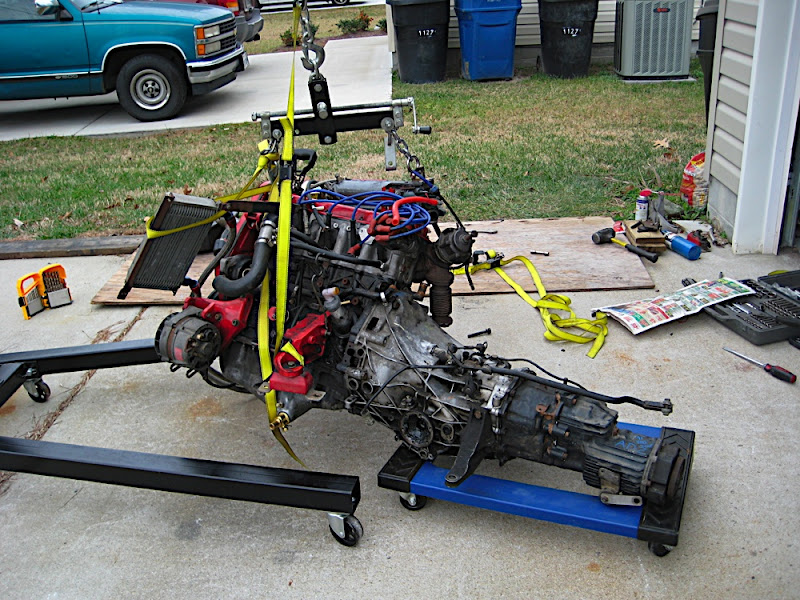
Inorder to make life a little easier on myself, I pulled the motor and trans together since I needed to drop the oil pan already for other projects. This was just an easier solution
Lowering it...
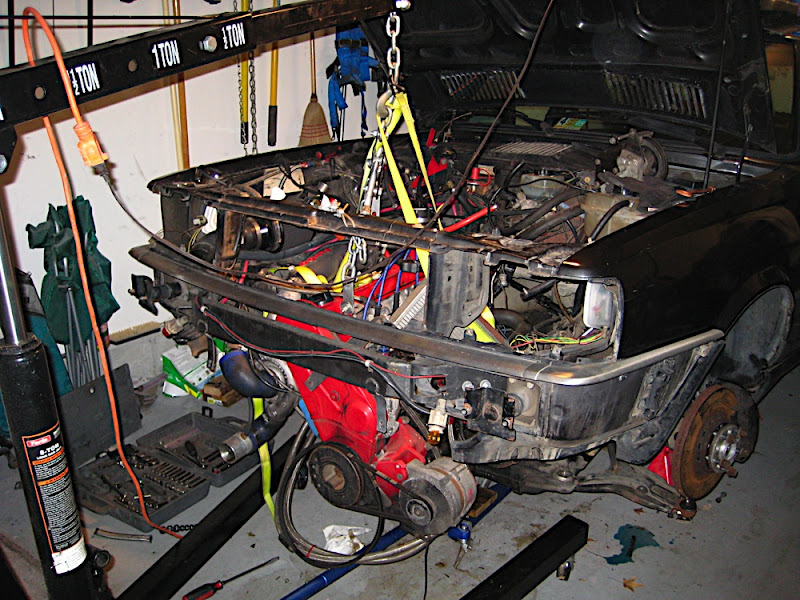
and lowering it....
and it's as low as it can go...
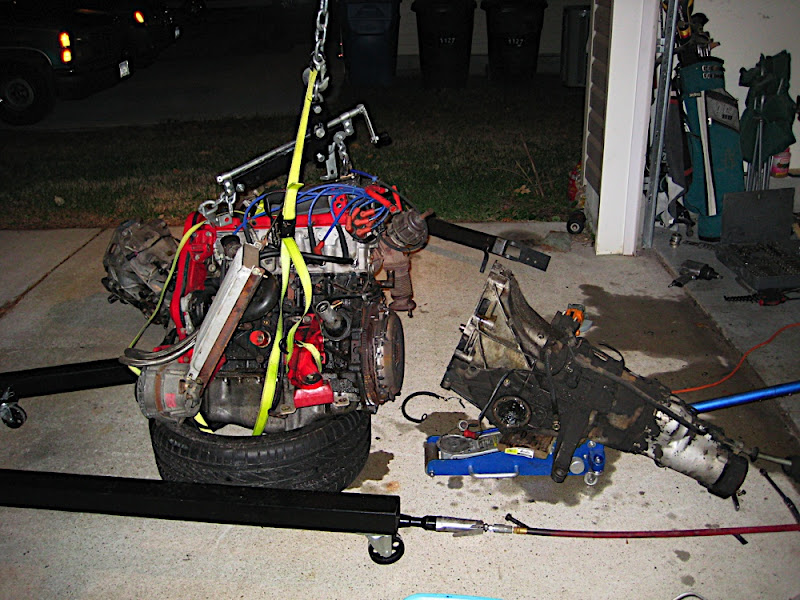
With the motor out, it was real easy to separate the trans... and a time for the old tranny to bid a final farewell from the rest of the car, as only pieces of it will return :-P
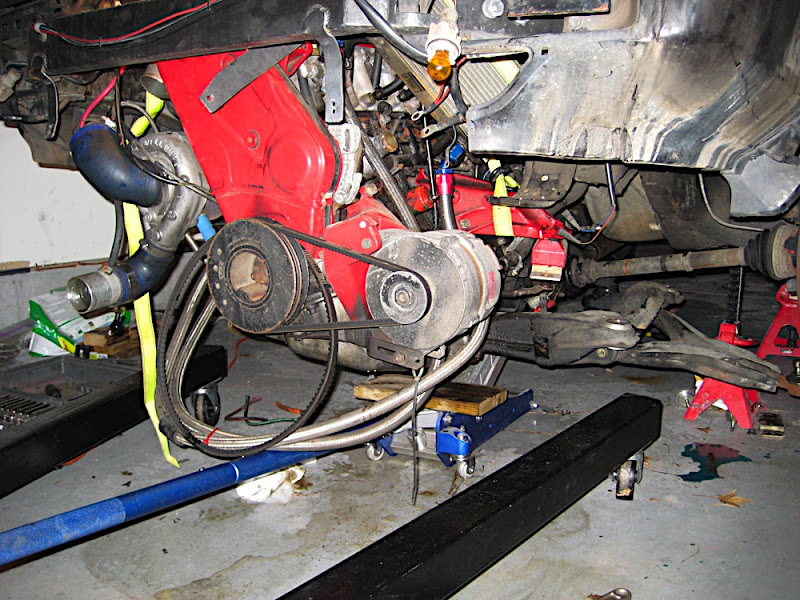
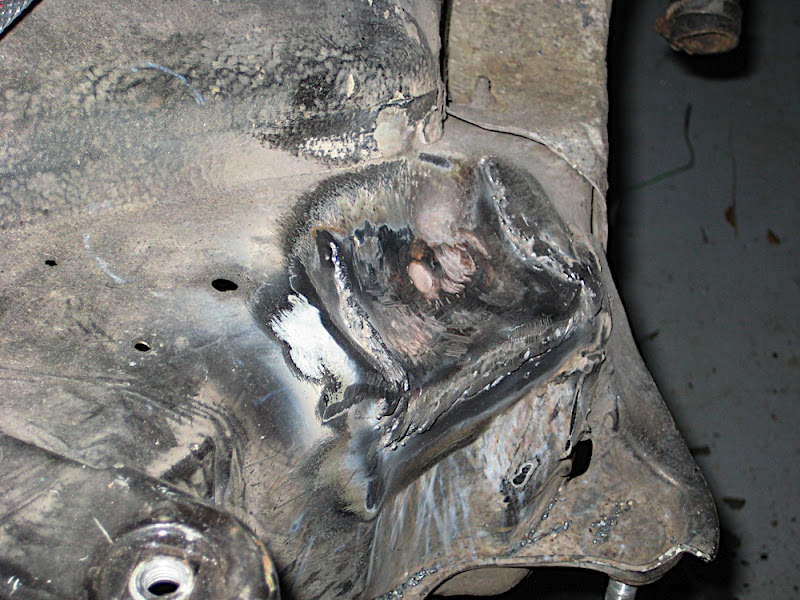
After pulling the motor, I became aware of a few issues that I knew about, but didn't realize the severity of them... first and foremost was the motor mount. I knew I had melted the pass side mount b/c of the turbo, but didn't realize how badly I had melted it!!!
Needless to say, it was in a world of hurting:
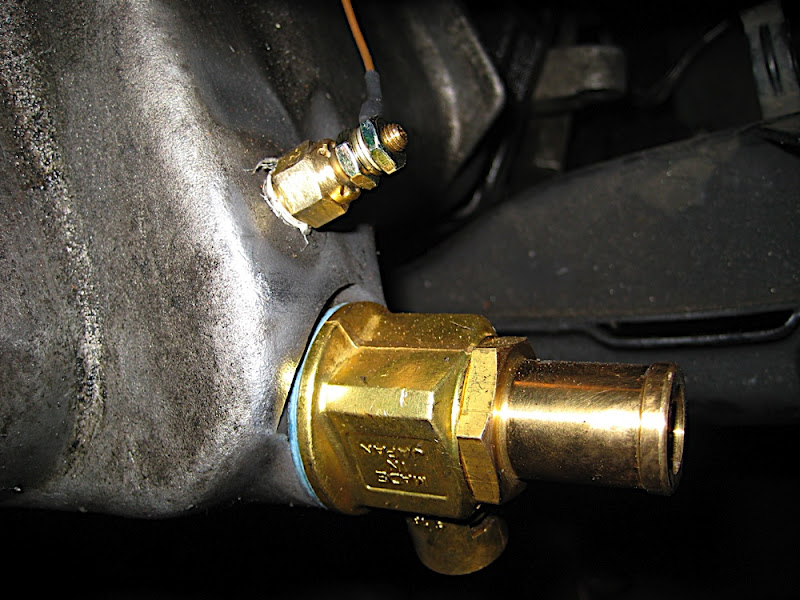
To add insult to injury, it turns out I scorched the starter motor wires as well!
Not really sure how I managed this since these don't seem to be that close to the downpipe (and the downpipe is wrapped near that location!), but regardless I addressed the heat issue. More on that later.
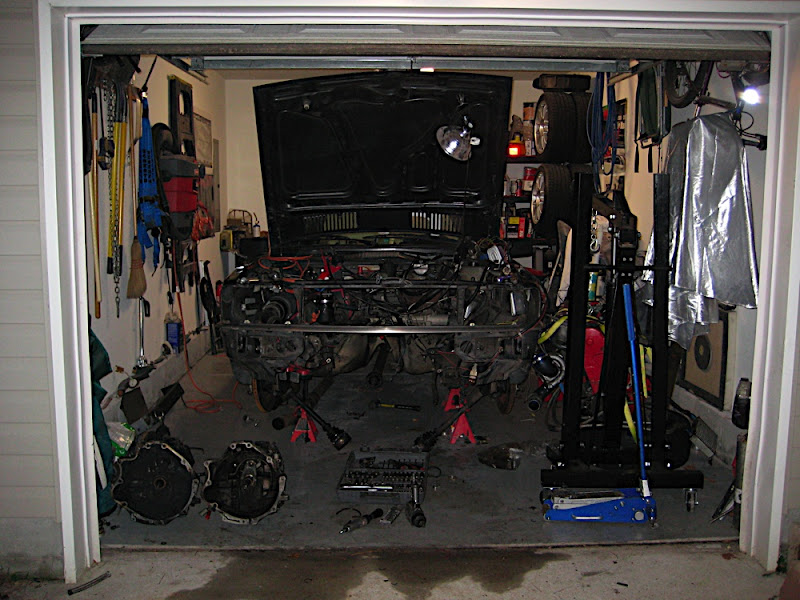
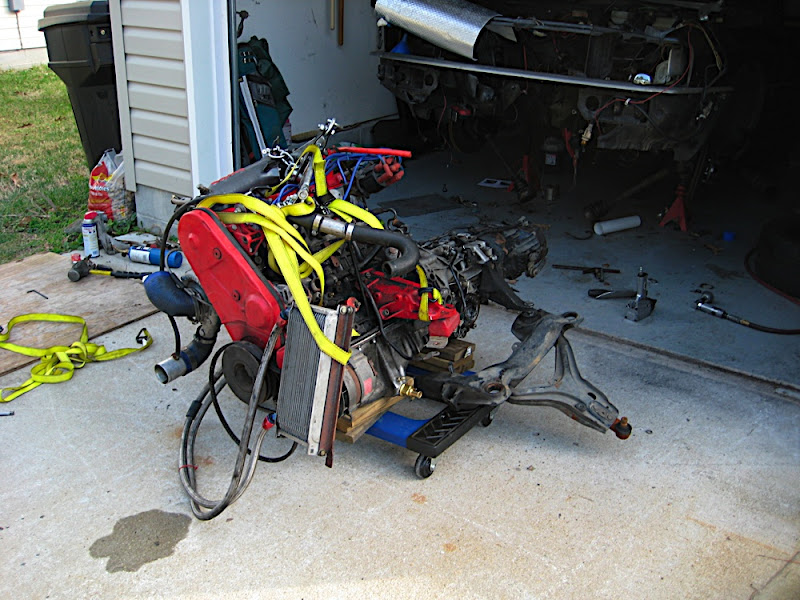
So this is how the 'ol girl was sitting right before xmas/new years:
Over the past few weeks, I've finally found time and motivation on the weekends and during the week to really get into this girl. On the weekends I spent 5-8 hrs on the car in a day, and the past 3 nights I've put in another 4ish hrs after working and going to the gym... so needless to say i'm dragging! But I needed to do it b/c the car has been more or less out of commission for 5 months now, and I'm sick of it sitting there and not being used...
So a few weeks ago, I started tearing into the two transmissions to swap parts and prep the 200 tranny to go into the 4000.
Things that needed to be moved/swapped to make the 200 trans work in the 4000:
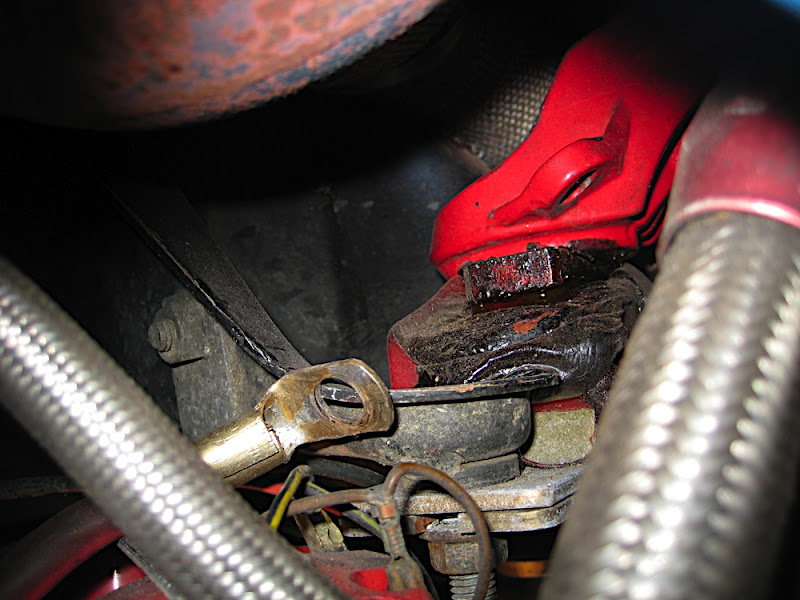
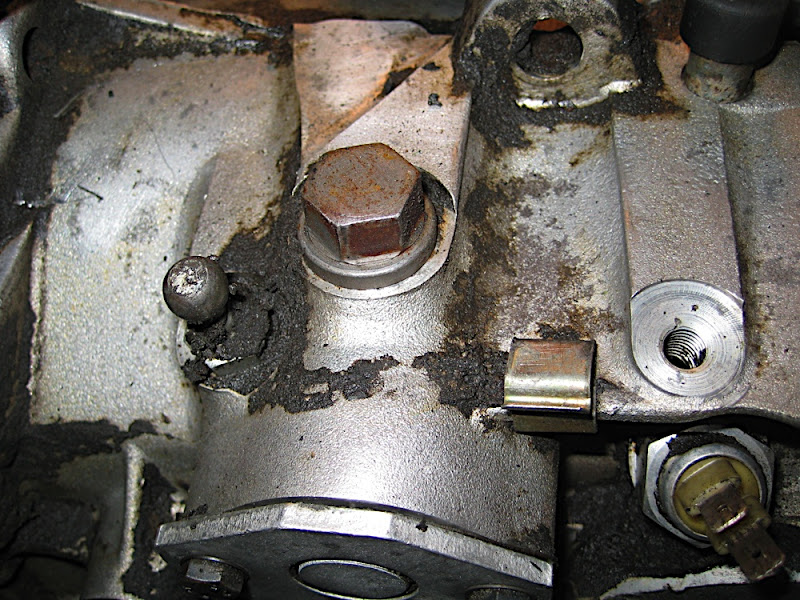
1) Relocate ball on transmission for dog bone to shift linkage. This was really simple... First picture is of the location for the 200. When you hook the 4000 linkage to this, it makes it go off at about a 45* ange from the transmission!
Took a lil bit of head scratching and looking at the two tranmissions to figure out what the issue was, but then it dawned on me. So here's where the ball needed to go:
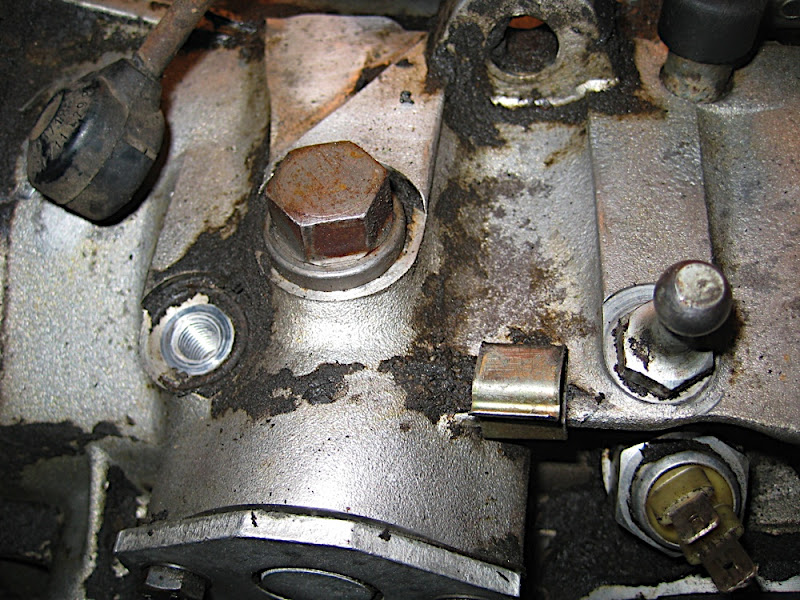
Once done everything lined up and the linkage went down parallel w/ the trans like it's suppose to.
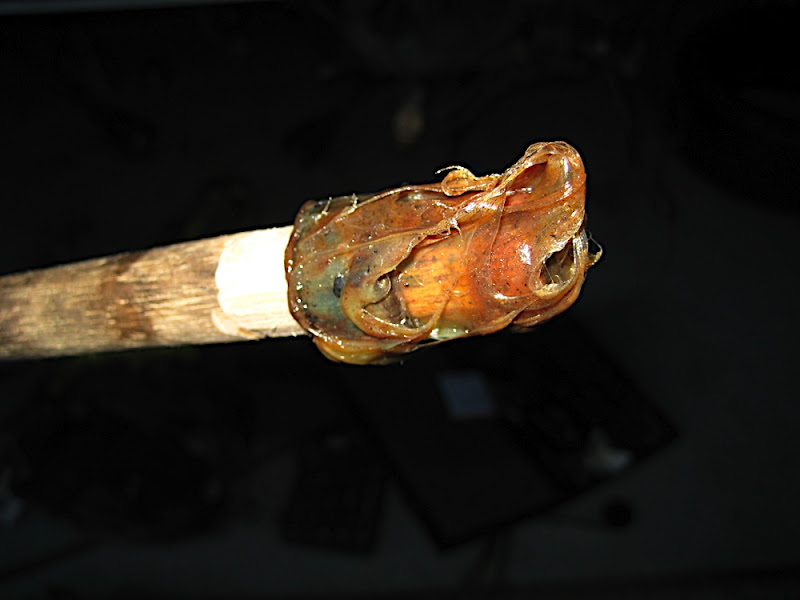
In order to swap the linkage over, I actually undid th ball from the trans so I didn't have to separate it since the bushings are NLA for this part. There's a 10mm nut under all this grime in the pic. Once you loosen that and shoot it w/ some pb blaster and rock it back and forth a lil bit, it'll pop right off.
2) Swapping parts from the 4k 016 to the 200 016...
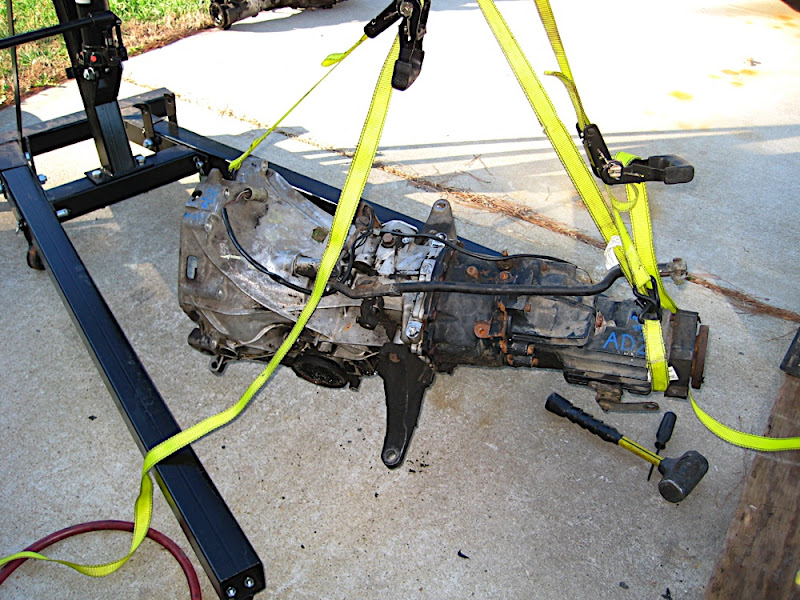
The easiest way to do this was to get the trans in the air and start pulling parts. Main things needed from the 4k trans was the axle cups and the speedo gear setup.
So I hung it up and started draining fluid and stripping it down:

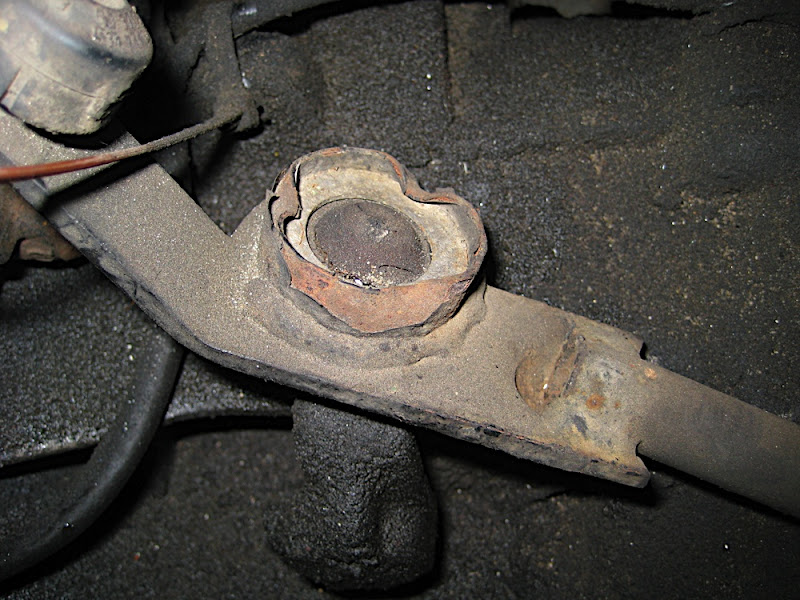
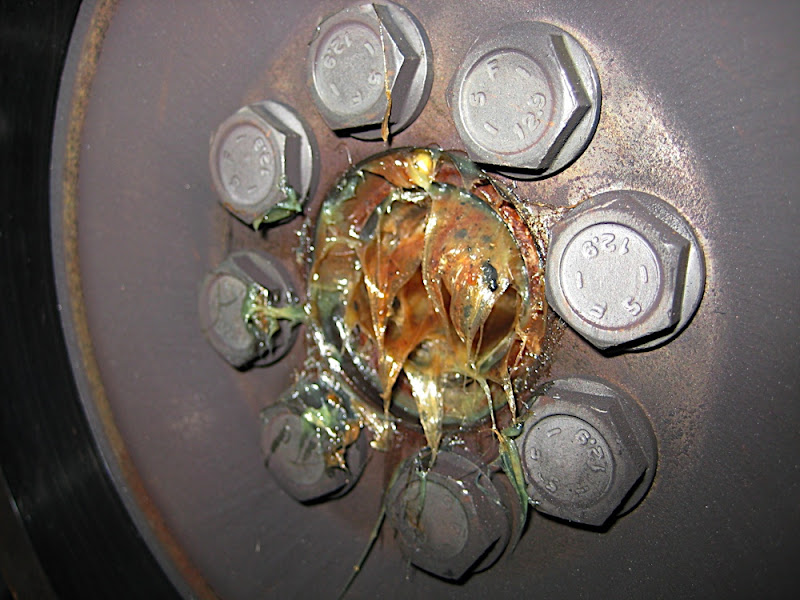
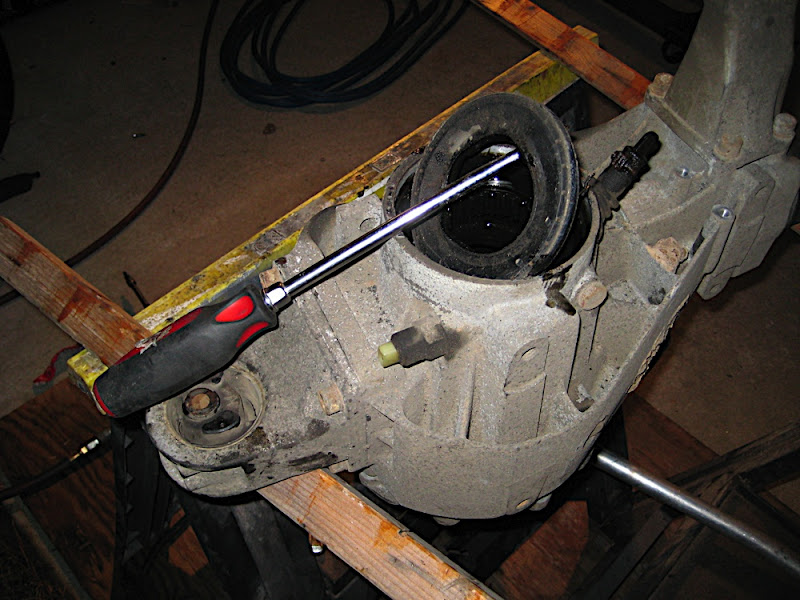
once fluid was drained, out came the axle cups. On the driver's side, here's what you need:
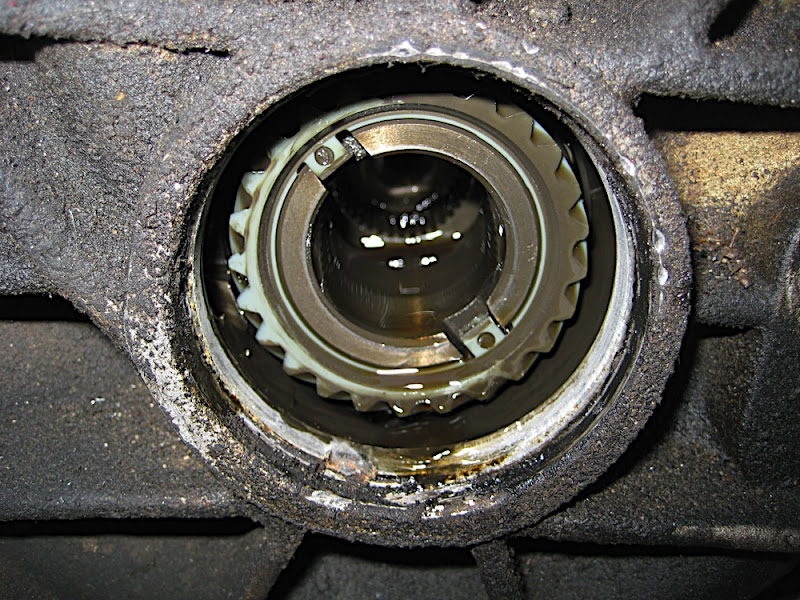
I used a small screwdriver to pop it out, but if I would do it again I'd get a set of picks. The screwdriver worked, but I was really nervous about breaking this thing as I could only pry at one side at a time! 2 picks would have let me pull it out evenly.
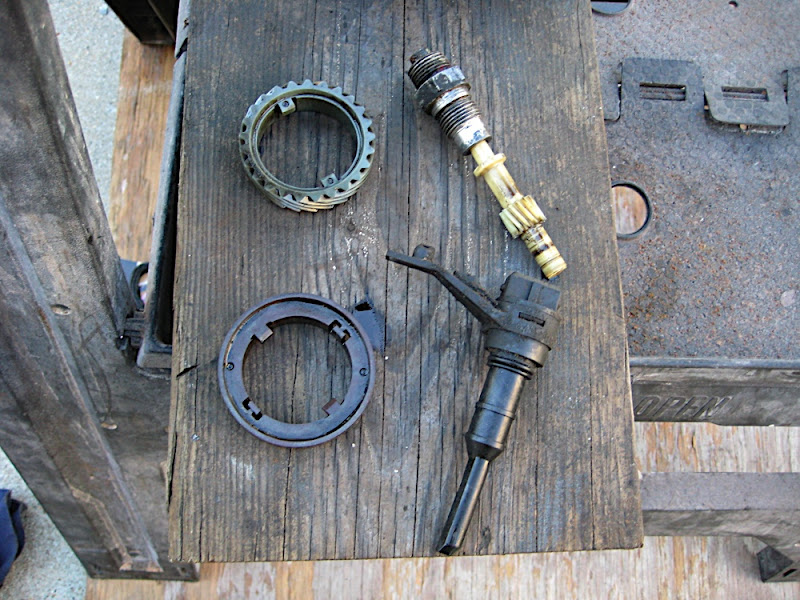
here it is out and next to the 200 016 electric speed sensor (which is for sale if anyone needs it!):
Next came the 200 016.
Again, hung it up to drain fluid and start stripping things out:

After a lil while I had the speed gear installed (popped right into place), mounts swapped, axle cups (with new seals) installed and fluids replaced... and it was once again ready to go back into the car:
3) Swap the pilot bearings! The 200 016 has a smaller input shaft than the 4000 016. Side by side comparison (200 on left, 4000 on right):
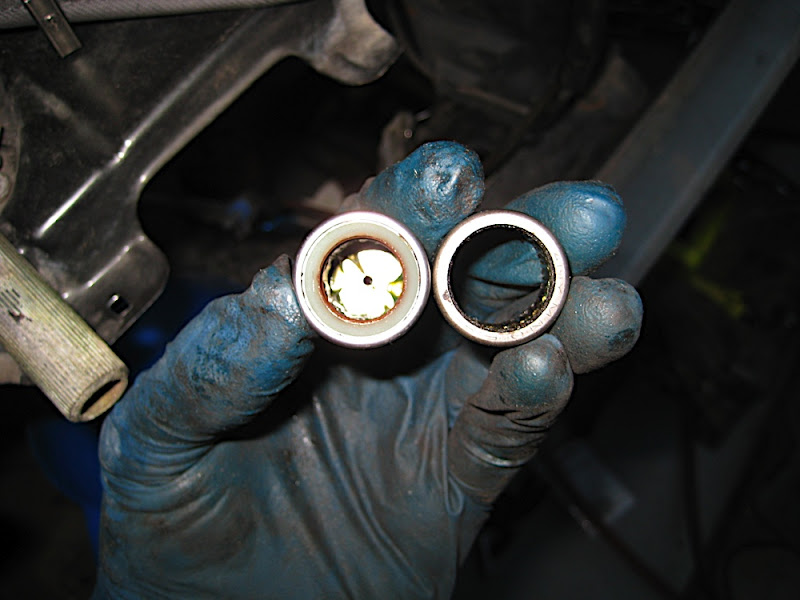
Over the years I had heard of all ways to pop these things out, but have never actually tried it until now (never had to!). I tried one trick, which was to run a tap into the old pilot bearing and pull it out, but I didn't have a tap big enough to bite on it. That brought on option 2... i.e. the messy way... grease and a dowel!!!
Basically I packed the pilot bearing w/ grease and then sanded down a dowel until it fit tightly into the pilot bearing... and then started beating on it w/ a hammer.
End result:
and a real mess!!
Once all this is complete, the trans is now ready to go into the car!
Unfortunately for me, I had other stuff to handle... namely the other issues I found while pulling the motor, etc.
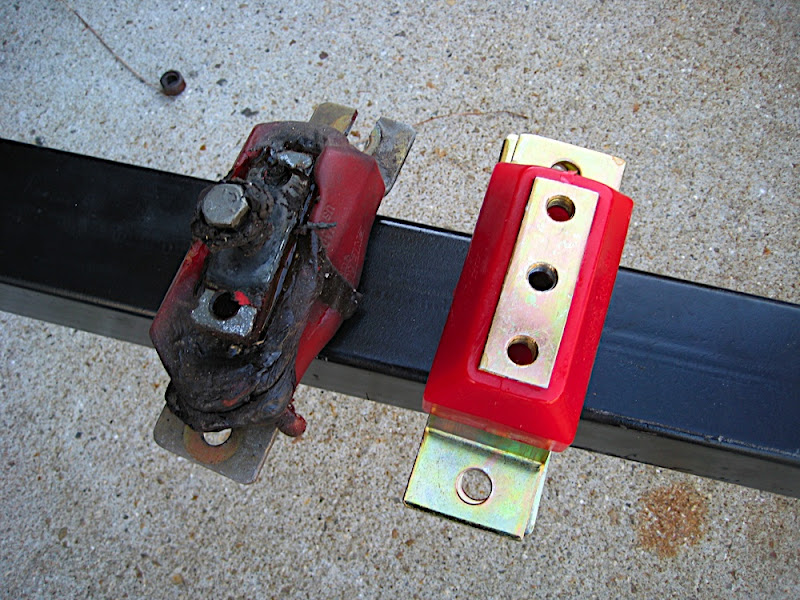
First... the motor mount... old vs new... yeah, pic says it all
This obviously was an easy fix... now preventing this from happening again, that's another story. Next step is to fabricate a new heat shield to help protect the mount from this again. I have a piece of aluminum bent and ready to go, but I'm in the middle of devising a way to mount it so that it doesn't come loose like last time. I also picked up some Aluminum/fiberglass heat shielding to put onto the AL plate I bent up. Damned if I'm going to let this happen again! haven't completed that part, so I'll update w/ pix later on.
Next was to make some more clearance for the downpipe. Although the 3" downpipe does sort of fit into the car w/o much of an issue, it was still a lot closer to the frame rail on the pass side than I would have liked. I had hit it a few times w/ a hammer before installing the motor originally, but now was the time to really make some room... so out came the grinder and welder once again:
Cut and formed:
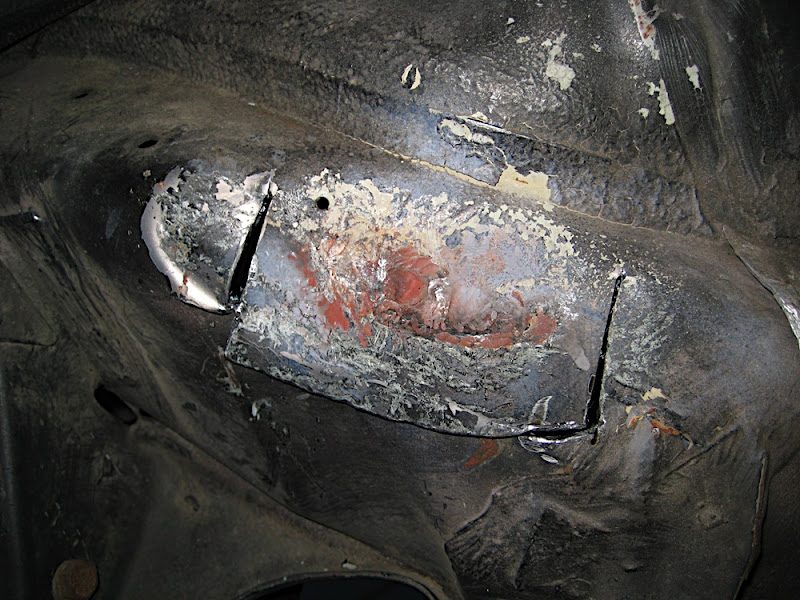
All welded up:
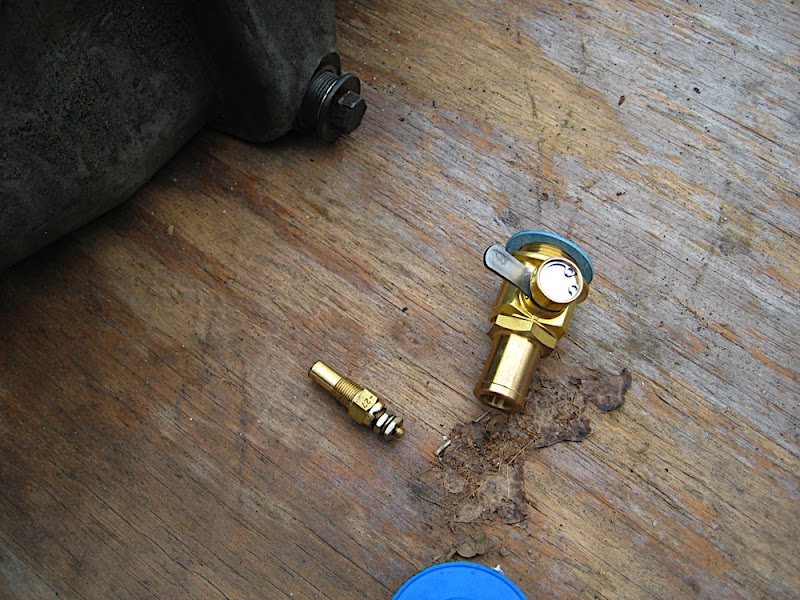
Now it was time to start laying into the motor. The biggest thing I needed to do here was install an oil temp sensor into the oil pan and toss in a nice Fumoto valve so I would stop spilling oil everytime I changed it (1" drain hole = gusher!!!).
I figured since I'll be making metal shavings inside the pan, I should pull the pan so I can clean it all out. This also gave me the opportunity to swap the gaskets since the ones in the motor were leaking already after 14k miles... that has more to do w/ me dropping the pan once already to R&R the oil pump and not replacing the gaskets though... oops.
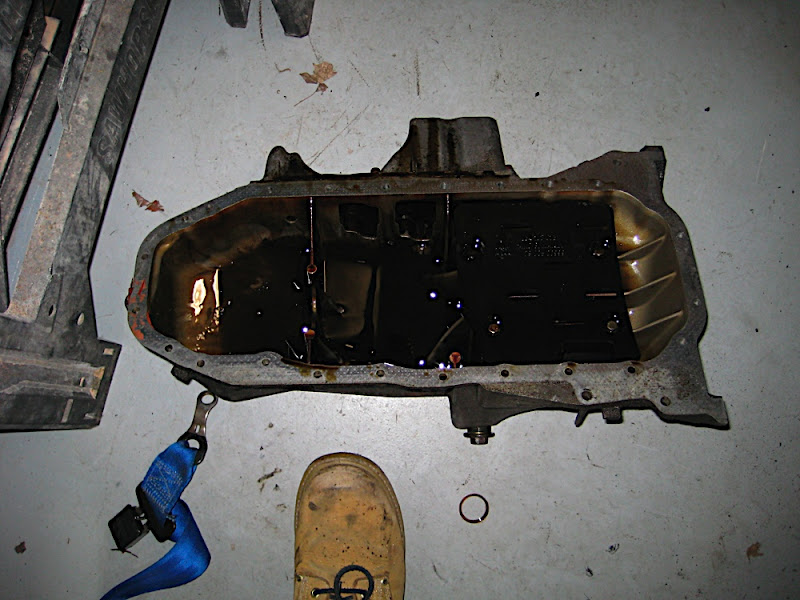
The oil pan removal procedure was a lot easier w/ the motor out of the car. WOuld have been nicer to have it on an engine stand (esp for reinstalling the pan), but I didn't want to turn the motor upside down and make a mess... so I just hung it and worked under it:
Oil pan out and ready to get worked over:
and everything installed and ready to go:
I hope I put the oil temp sensor low enough in the pan. I wanted to put it in line w/ the drain (lowest point obviously) but there wasnt enough room there for the sensor to stick into the pan. We'll see how it works. Worst case, I do it again...... *sigh* :bashtard:
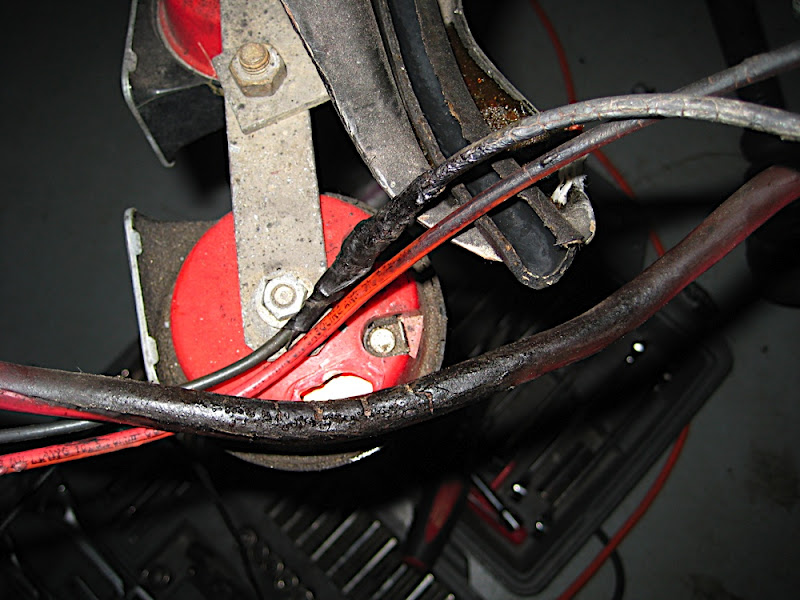
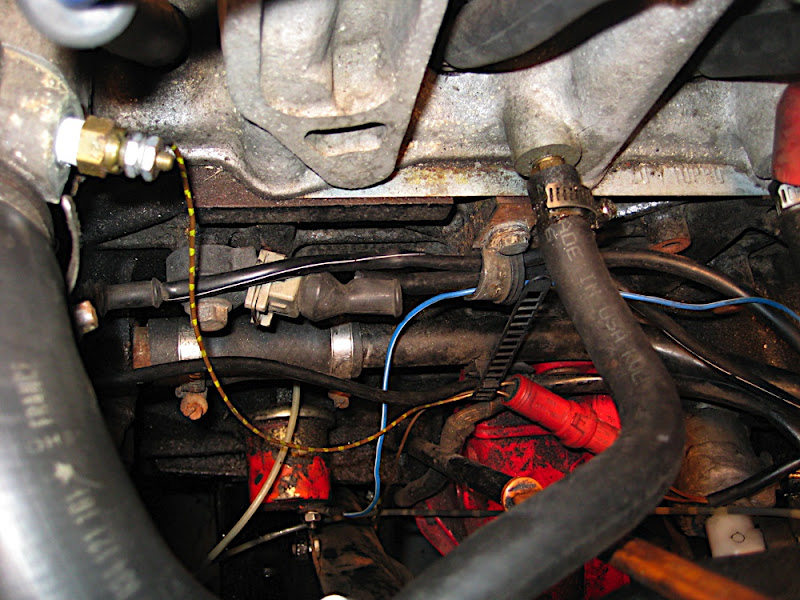
And the final step was to R&R the starter motor wire... which was scorched something fierce. In order to prevent this from happening again, I picked up some fire sleeve from my local hydraulic shop and slipped it over:
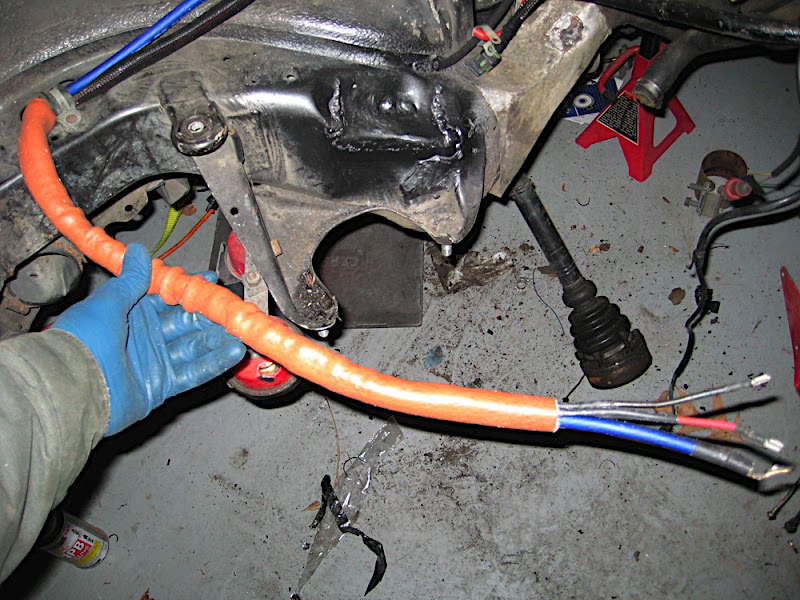
You can also see the painted portion of the frame that I bent in to clearance for the downpipe.
I'm also going to put some of this heat shielding that I bought around the starter. HOpefully between the two I won't have an issue anymore, but who knows... lol. Time will tell on that one I guess.
Once this was all said and done... it was finally time to mate the motor to its new trans!
I can't even explain to you how much easier it is to mate the two out of the car vs the hump fest that went on trying to mate everything w/ the tranny in the car. This literally took me 5 min:
My neighbor was outside and started laughing at me when I started chuckling and said "that was way too easy."
And then onto a furniture dolly it went so I could roll the motor under the car and prep for lifting it into place:
After a few hrs of wrestling with the motor to get it back into place........ we have success!
Torsen tranny in its new home

along w/ a new slave cyl hose I had the hydraulic shop make me since the old one was getting kind of stiff... cost a whopping $20. Def a cheaper option than the OEM!
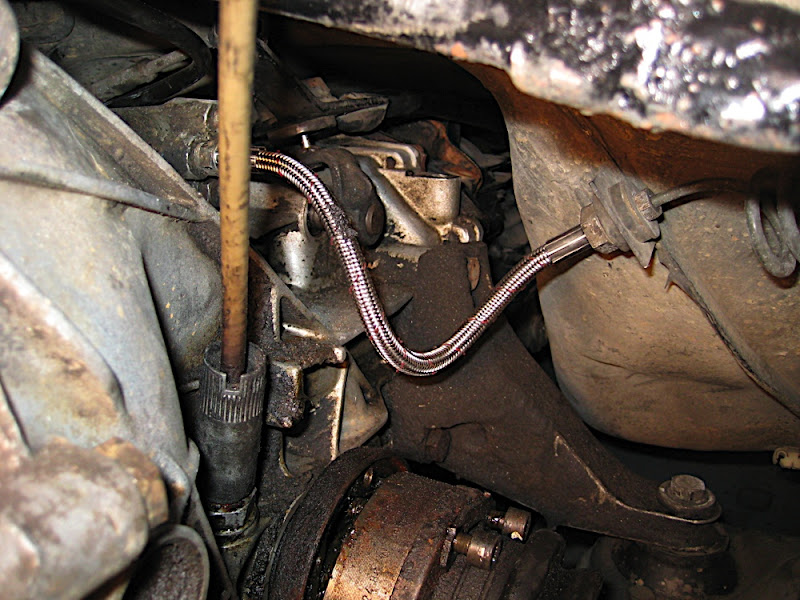
He basically took the ends off the old hose and then replaced the hose. Worked perfectly.
And here's the nice and freshly rebuild radiator:
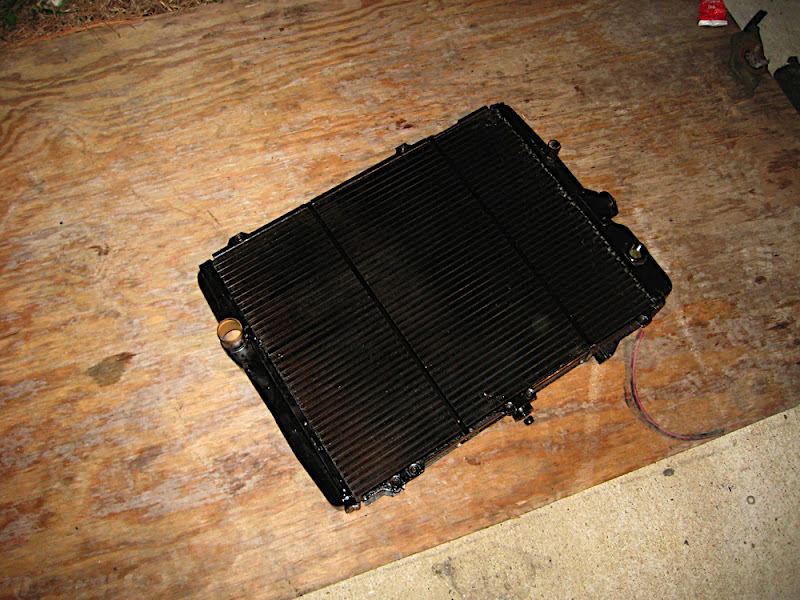
I think this was one of the big reasons I had trouble at Watkins Glen back in August and overheated the car... that and not having and proper shrouding around it. When I took it to the radiator shop, we were planning on doing a recore for a more efficient core. After he opened up my radiator, it turned out audi designed a real nice core! What was the issue? 75% of the OEM core was blocked!!! Wish I would have had my camera with me when he opened it up as I couldn't believe how blocked the tubes were. Once we saw that, and ran some #s on the volume differences b/n the old and new core, we found that the new core didn't really gain me anything. So instead of swapping cores, I just had him rebuild mine. Turned out real nice, and hopefully it'll keep the temps where they need to be. I think that b/n this and the shrouding I built, I should be golden!
Here's a misc pic of some wiring. Now that I won't be using the red plug that used to signal the diff panel that the center diff was locked I'm now rewiring it to run my aftermarket oil and water temp gauges Nice and clean... I like it!
This is what the 'ol girl now looks like after 7 hrs between monday and tuesday night.
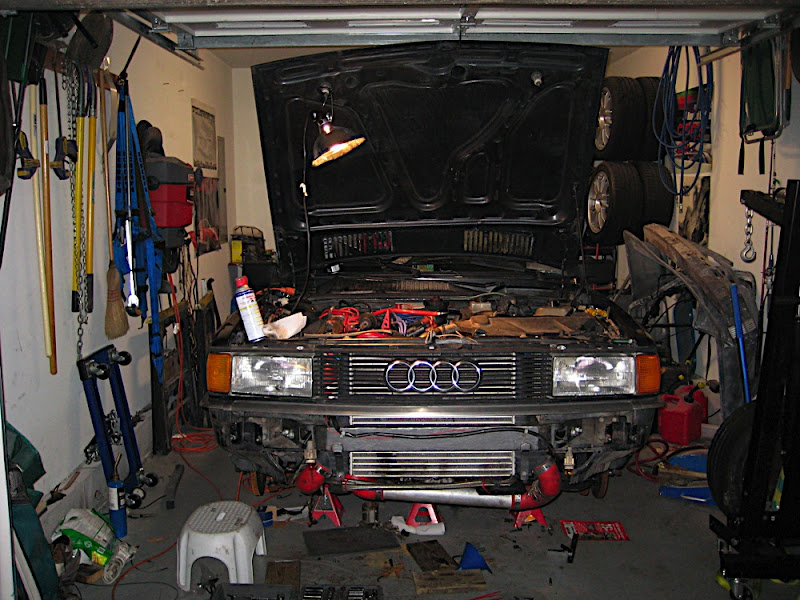
Almost looks like a car again! Unfortunately I still have a lot of work to do. I finished hooking up the axles and suspension last night in the front, but now tore out the rear so I can start cracking on the rear torsen swap... So next update should be a good one as the car should be sitting on its 4 feet again and riding w/ full torsen goodness 8)
Back in the summer, I was able to pick up a good used tranny from a guy up in Vermont for a decent deal... and he even delivered it to me to boot!!!
After having it sit in my garage for a few months, I figured it was time to start making some headway. To make life a lil cleaner for myself, I figured a trip to the carwash was in order to get the crazy amount of grease/grit/grime off... so a can of 'Gunk' and a can or two of carb cleaner later we had a much less greasy transmission... not spotless, but good enough to handle:
Before:
After:
After a bit more waiting, it was finally time to get the ball rolling and get this swap underway.
Inorder to make life a little easier on myself, I pulled the motor and trans together since I needed to drop the oil pan already for other projects. This was just an easier solution
Lowering it...
and lowering it....
and it's as low as it can go...
With the motor out, it was real easy to separate the trans... and a time for the old tranny to bid a final farewell from the rest of the car, as only pieces of it will return :-P
After pulling the motor, I became aware of a few issues that I knew about, but didn't realize the severity of them... first and foremost was the motor mount. I knew I had melted the pass side mount b/c of the turbo, but didn't realize how badly I had melted it!!!
Needless to say, it was in a world of hurting:
To add insult to injury, it turns out I scorched the starter motor wires as well!
Not really sure how I managed this since these don't seem to be that close to the downpipe (and the downpipe is wrapped near that location!), but regardless I addressed the heat issue. More on that later.
So this is how the 'ol girl was sitting right before xmas/new years:
Over the past few weeks, I've finally found time and motivation on the weekends and during the week to really get into this girl. On the weekends I spent 5-8 hrs on the car in a day, and the past 3 nights I've put in another 4ish hrs after working and going to the gym... so needless to say i'm dragging! But I needed to do it b/c the car has been more or less out of commission for 5 months now, and I'm sick of it sitting there and not being used...
So a few weeks ago, I started tearing into the two transmissions to swap parts and prep the 200 tranny to go into the 4000.
Things that needed to be moved/swapped to make the 200 trans work in the 4000:
1) Relocate ball on transmission for dog bone to shift linkage. This was really simple... First picture is of the location for the 200. When you hook the 4000 linkage to this, it makes it go off at about a 45* ange from the transmission!
Took a lil bit of head scratching and looking at the two tranmissions to figure out what the issue was, but then it dawned on me. So here's where the ball needed to go:
Once done everything lined up and the linkage went down parallel w/ the trans like it's suppose to.
In order to swap the linkage over, I actually undid th ball from the trans so I didn't have to separate it since the bushings are NLA for this part. There's a 10mm nut under all this grime in the pic. Once you loosen that and shoot it w/ some pb blaster and rock it back and forth a lil bit, it'll pop right off.
2) Swapping parts from the 4k 016 to the 200 016...
The easiest way to do this was to get the trans in the air and start pulling parts. Main things needed from the 4k trans was the axle cups and the speedo gear setup.
So I hung it up and started draining fluid and stripping it down:
once fluid was drained, out came the axle cups. On the driver's side, here's what you need:
I used a small screwdriver to pop it out, but if I would do it again I'd get a set of picks. The screwdriver worked, but I was really nervous about breaking this thing as I could only pry at one side at a time! 2 picks would have let me pull it out evenly.
here it is out and next to the 200 016 electric speed sensor (which is for sale if anyone needs it!):
Next came the 200 016.
Again, hung it up to drain fluid and start stripping things out:
After a lil while I had the speed gear installed (popped right into place), mounts swapped, axle cups (with new seals) installed and fluids replaced... and it was once again ready to go back into the car:
3) Swap the pilot bearings! The 200 016 has a smaller input shaft than the 4000 016. Side by side comparison (200 on left, 4000 on right):
Over the years I had heard of all ways to pop these things out, but have never actually tried it until now (never had to!). I tried one trick, which was to run a tap into the old pilot bearing and pull it out, but I didn't have a tap big enough to bite on it. That brought on option 2... i.e. the messy way... grease and a dowel!!!
Basically I packed the pilot bearing w/ grease and then sanded down a dowel until it fit tightly into the pilot bearing... and then started beating on it w/ a hammer.
End result:
and a real mess!!
Once all this is complete, the trans is now ready to go into the car!
Unfortunately for me, I had other stuff to handle... namely the other issues I found while pulling the motor, etc.
First... the motor mount... old vs new... yeah, pic says it all
This obviously was an easy fix... now preventing this from happening again, that's another story. Next step is to fabricate a new heat shield to help protect the mount from this again. I have a piece of aluminum bent and ready to go, but I'm in the middle of devising a way to mount it so that it doesn't come loose like last time. I also picked up some Aluminum/fiberglass heat shielding to put onto the AL plate I bent up. Damned if I'm going to let this happen again! haven't completed that part, so I'll update w/ pix later on.
Next was to make some more clearance for the downpipe. Although the 3" downpipe does sort of fit into the car w/o much of an issue, it was still a lot closer to the frame rail on the pass side than I would have liked. I had hit it a few times w/ a hammer before installing the motor originally, but now was the time to really make some room... so out came the grinder and welder once again:
Cut and formed:
All welded up:
Now it was time to start laying into the motor. The biggest thing I needed to do here was install an oil temp sensor into the oil pan and toss in a nice Fumoto valve so I would stop spilling oil everytime I changed it (1" drain hole = gusher!!!).
I figured since I'll be making metal shavings inside the pan, I should pull the pan so I can clean it all out. This also gave me the opportunity to swap the gaskets since the ones in the motor were leaking already after 14k miles... that has more to do w/ me dropping the pan once already to R&R the oil pump and not replacing the gaskets though... oops.
The oil pan removal procedure was a lot easier w/ the motor out of the car. WOuld have been nicer to have it on an engine stand (esp for reinstalling the pan), but I didn't want to turn the motor upside down and make a mess... so I just hung it and worked under it:
Oil pan out and ready to get worked over:
and everything installed and ready to go:
I hope I put the oil temp sensor low enough in the pan. I wanted to put it in line w/ the drain (lowest point obviously) but there wasnt enough room there for the sensor to stick into the pan. We'll see how it works. Worst case, I do it again...... *sigh* :bashtard:
And the final step was to R&R the starter motor wire... which was scorched something fierce. In order to prevent this from happening again, I picked up some fire sleeve from my local hydraulic shop and slipped it over:
You can also see the painted portion of the frame that I bent in to clearance for the downpipe.
I'm also going to put some of this heat shielding that I bought around the starter. HOpefully between the two I won't have an issue anymore, but who knows... lol. Time will tell on that one I guess.
Once this was all said and done... it was finally time to mate the motor to its new trans!
I can't even explain to you how much easier it is to mate the two out of the car vs the hump fest that went on trying to mate everything w/ the tranny in the car. This literally took me 5 min:
My neighbor was outside and started laughing at me when I started chuckling and said "that was way too easy."
And then onto a furniture dolly it went so I could roll the motor under the car and prep for lifting it into place:
After a few hrs of wrestling with the motor to get it back into place........ we have success!
Torsen tranny in its new home
along w/ a new slave cyl hose I had the hydraulic shop make me since the old one was getting kind of stiff... cost a whopping $20. Def a cheaper option than the OEM!
He basically took the ends off the old hose and then replaced the hose. Worked perfectly.
And here's the nice and freshly rebuild radiator:
I think this was one of the big reasons I had trouble at Watkins Glen back in August and overheated the car... that and not having and proper shrouding around it. When I took it to the radiator shop, we were planning on doing a recore for a more efficient core. After he opened up my radiator, it turned out audi designed a real nice core! What was the issue? 75% of the OEM core was blocked!!!
Wish I would have had my camera with me when he opened it up as I couldn't believe how blocked the tubes were. Once we saw that, and ran some #s on the volume differences b/n the old and new core, we found that the new core didn't really gain me anything. So instead of swapping cores, I just had him rebuild mine. Turned out real nice, and hopefully it'll keep the temps where they need to be. I think that b/n this and the shrouding I built, I should be golden!Here's a misc pic of some wiring. Now that I won't be using the red plug that used to signal the diff panel that the center diff was locked I'm now rewiring it to run my aftermarket oil and water temp gauges
Nice and clean... I like it!This is what the 'ol girl now looks like after 7 hrs between monday and tuesday night.
Almost looks like a car again! Unfortunately I still have a lot of work to do. I finished hooking up the axles and suspension last night in the front, but now tore out the rear so I can start cracking on the rear torsen swap... So next update should be a good one as the car should be sitting on its 4 feet again and riding w/ full torsen goodness 8)
-
ralleyquattro

- Posts: 858
- Joined: Wed Feb 27, 2013 1:46 pm
Pics no worky.. please fix 
Martin Pajak
http://www.quattro.ca
82 Audi Ur-q, SQ project
83 Audi 80 q, Euro 2-Door
85 Audi Ur-q, Euro mit 3B
91 Coupe Quattro
93 Audi 80 q Avant, 2.5 TDI with 6-speed
04 Audi A4 1.8Tq Avant USP 6-speed
04 Audi A4 3.0q Avant USP 6-speed
http://www.quattro.ca
82 Audi Ur-q, SQ project
83 Audi 80 q, Euro 2-Door
85 Audi Ur-q, Euro mit 3B
91 Coupe Quattro
93 Audi 80 q Avant, 2.5 TDI with 6-speed
04 Audi A4 1.8Tq Avant USP 6-speed
04 Audi A4 3.0q Avant USP 6-speed
-
cuatrokoop
cuatrokoop wrote:Hey Justin, how much you want for that speed sensor stuff? I'm putting an older 016 (mechanical speedo) into the V8. I'm assuming that stuff will work with the V8's speedo/odo?
Make me an offer. It worked in a 200 20v, so I'd guess that it work w/ the V8, but I'm not 100% on that.
i like the clutch line solution... i was going try and get one installed using adapters, but there weren't any at the place i went to (even in their catalog), only 12mm lines. i like the reuse of old fittings... clever
Thanks, Derek! Yeah, the guy thought he was going to have to cut and weld, but found that everything on the OEM hose just popped apart. Cheap and easy solution for sure!
-
WAUG0806
WAUG0806 wrote:Thanks for the pics and descriptions... I am going to check the heat shield and condition of my ghetto motor mounts!
Did you have an exhaust leak around the turbo or was that done with radiant heat?
I'm assuming it was all radiant heat, as it doesn't sound like I have an exhaust leak... I haven't stuck my hand next to the turbo/downpipe to see if anything hot was coming out, though. The gasket is also 100% intact b/n the downpipe and the turbo hot side.
Regardless, it basically cooked the motor mount, the coolant line (rubber portion after the braided hose) and the starter wires. So things were getting toasty!!
As for the pix and what not, glad I can help. Trying to make this something for people to look at and realize what I"m talking about vs trying to guess from what people type out. Ya know, pic is worth a thousand words
-
ralleyquattro
- Posts: 858
- Joined: Wed Feb 27, 2013 1:46 pm
Just a side note, when you changed to 3B/7A oil pan, did you use the matching oil pickup tube with the plastic end on it?
That has to be changed otherwise the stock MC pickup will not reach the bottom of the alloy oil pan and you will notice that when you are slightly low on oil or even if full, under hard acceleration the oil press gauge will flicker (loss of press)
BTDT on my MC ur-q conversion. So watch your oil press gauge if you didn't get a matching pickup.
Hope this helps
Martin Pajak
http://www.quattro.ca
82 Audi Ur-q, SQ project
83 Audi 80 q, Euro 2-Door
85 Audi Ur-q, Euro mit 3B
91 Coupe Quattro
93 Audi 80 q Avant, 2.5 TDI with 6-speed
04 Audi A4 1.8Tq Avant USP 6-speed
04 Audi A4 3.0q Avant USP 6-speed
http://www.quattro.ca
82 Audi Ur-q, SQ project
83 Audi 80 q, Euro 2-Door
85 Audi Ur-q, Euro mit 3B
91 Coupe Quattro
93 Audi 80 q Avant, 2.5 TDI with 6-speed
04 Audi A4 1.8Tq Avant USP 6-speed
04 Audi A4 3.0q Avant USP 6-speed
-
WAUG0806
like Martin Said, and I'd whip up a windage set-up too since you have been tracking the car... hard to monitor oil pressure during track days, and the wimpy 4kq audible alarm no good when wearing a helmet BTDT and paid for the rebuild!
Attachment ( 14894 ) : Oil pan with clever provision for a dipstick.jpg
Attachment ( 14894 ) : Oil pan with clever provision for a dipstick.jpg
I believe it has the 7a pick up tube in it, but I need to check w/ Carson again since he was the one who built the short block that's in my car. I got the 7a oilpan as part of the package deal.
I have the windage tray in there, but not the extra baffle you have, Doug. I couldn't figure out a way to make it work so I just left it be for now. I'll keep my eye on my oil pressure gauge and see where it goes. On the track I noticed that the oil pressure stayed strong during accel and turns, so I should be ok.
Thanks for the heads up, though. I will keep an eye on it all.
-
ralleyquattro
- Posts: 858
- Joined: Wed Feb 27, 2013 1:46 pm
Did the hydraulic shop reuse the original clutch hose fittings when they made you that nice SS clutch flex?? Looks way sexy!
Martin Pajak
http://www.quattro.ca
82 Audi Ur-q, SQ project
83 Audi 80 q, Euro 2-Door
85 Audi Ur-q, Euro mit 3B
91 Coupe Quattro
93 Audi 80 q Avant, 2.5 TDI with 6-speed
04 Audi A4 1.8Tq Avant USP 6-speed
04 Audi A4 3.0q Avant USP 6-speed
http://www.quattro.ca
82 Audi Ur-q, SQ project
83 Audi 80 q, Euro 2-Door
85 Audi Ur-q, Euro mit 3B
91 Coupe Quattro
93 Audi 80 q Avant, 2.5 TDI with 6-speed
04 Audi A4 1.8Tq Avant USP 6-speed
04 Audi A4 3.0q Avant USP 6-speed
-
yodasfro
ralleyquattro wrote:Did the hydraulic shop reuse the original clutch hose fittings when they made you that nice SS clutch flex?? Looks way sexy!
Yup, sure did! And the fact that it only cost $20 vs the OEM hose that was ~$60ish, I thought it was a steal

yodasfro wrote:I can tell you from your pic it is the 7a pick up tube.
Thanks for the confirmation, Austin! Never had a side-by-side comparison, but I wouldn't expect Carson to cut any corners.
-
WAUG0806
WAUG0806 wrote:Where is Carson... miss the guy even though his engine is turned sideways! :slap:
Been almost 5 months since he posted to MG!
He's around on AW a lot. From what i can tell work and life have been keeping him real busy. Also, he sold his GTI and picked up a used B5 S4, so his engine is turned the right way again
How to w/ pics for V8 Torsen Rear Diff Swap into 4000
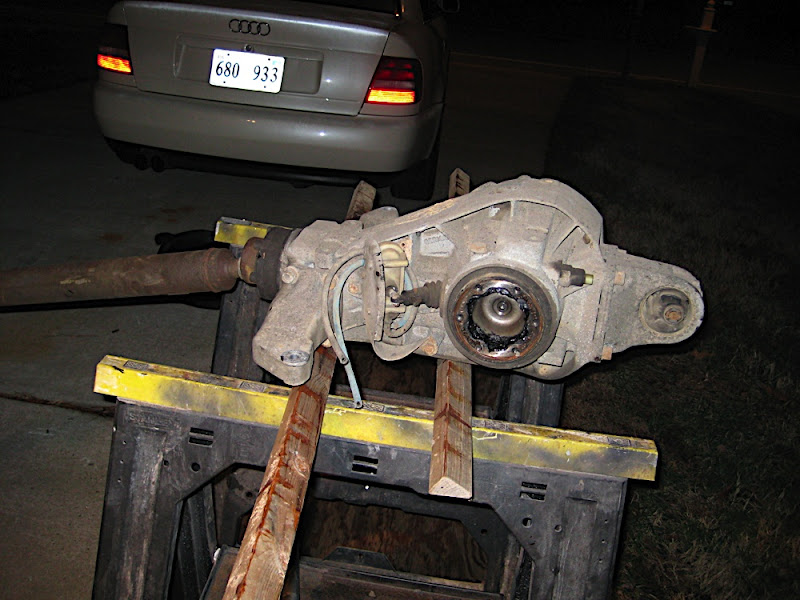
Over the course of the past month+ I've been planning this swap out and getting things organized. During some free time, I took the time to tear apart the V8 rear diff I picked up mid summer from the local pick and pull ($65 rear diff anyone??? ).

axle cups out waiting for some machine work
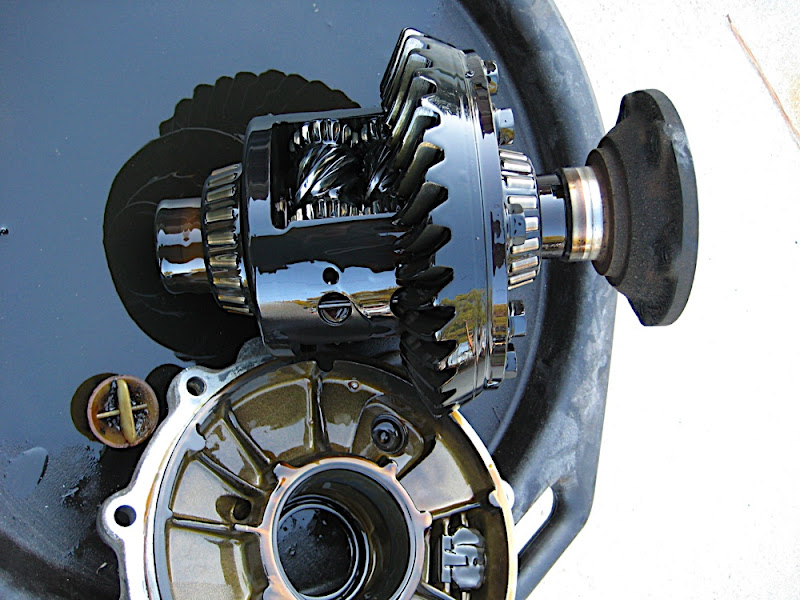
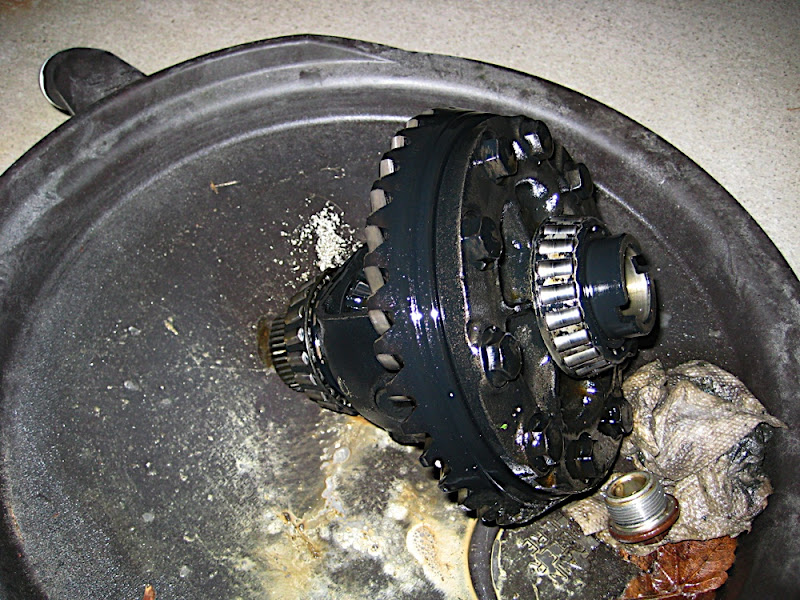
and sweet sweet torsen goodness:
Things you need to save for this swap into the 4000 rear diff:
1) Axle cups
2) Big oil seal. This is in there pretty tight, so carefully get it out. I hit it on the back side w/ a big screwdriver and just kept working my way around until it came out. This can be replaced, but it's BIG $$! So save it if you can
3) Bolts to axle cups
Things that need to be done in order to make the torsen rear diff work in the 4000:
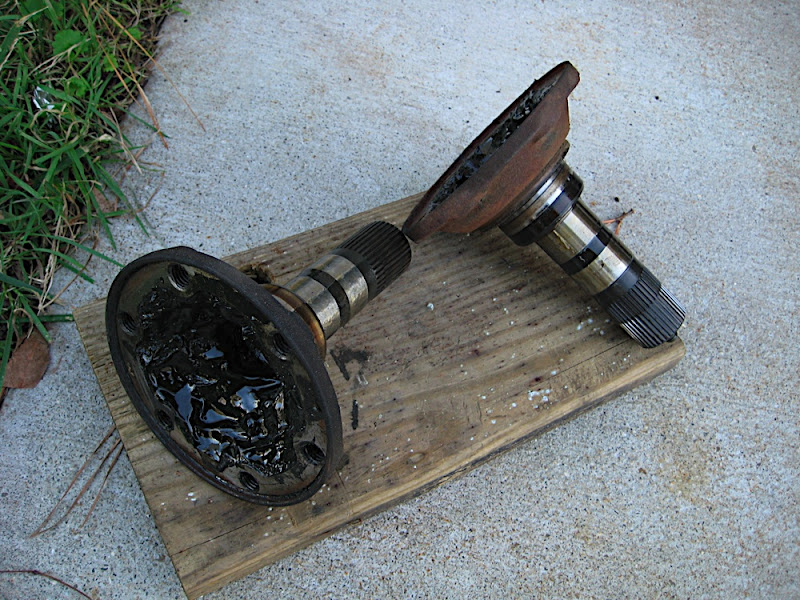
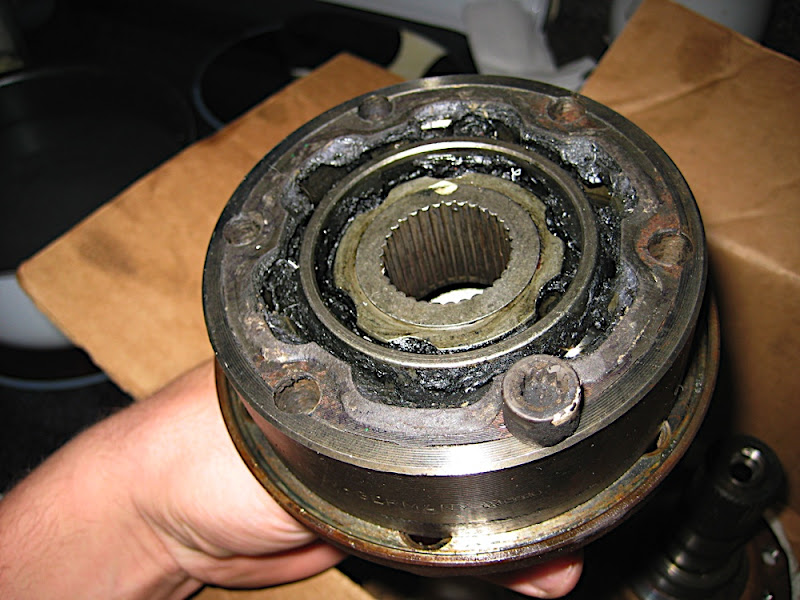
Unfortunately, the V8 rear axle cups are bigger than the 4000 inner CVs, as shown here:
Though it one could say just use the 4000 axle flanges, this isn't an option because they are too short to fit in the V8 rear diff, so there isn't enough spline engagement to work... so the V8 Axle cups needed to get machined... this is covered a little lower in the post.
After doing some research, I finally got the info that I needed as to what machining needed to be done to get this to work (thanks, Nate for sharing the info). During this research I also heard that there might be interferences b/n the cups and the 4000 diff, so I held off bringing these to the machinest until I got the rear diff out to confirm fitment.
So the next logical step was to get the rear diff out of the 4000 and start playing around with it. After getting the motor and such in the car, I went right at getting the rear diff down and out of the car...
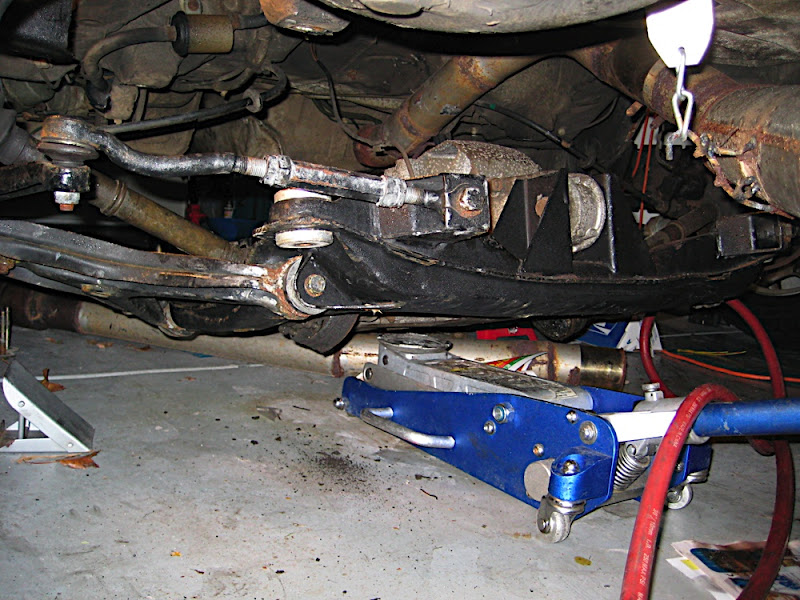
Hoping to dismantle as little as possible, I was able to drop the rear subframe enough so that I could just shimmy the rear diff out from the car and not touch the rest of the suspension... thankfully, this worked out as I hoped!
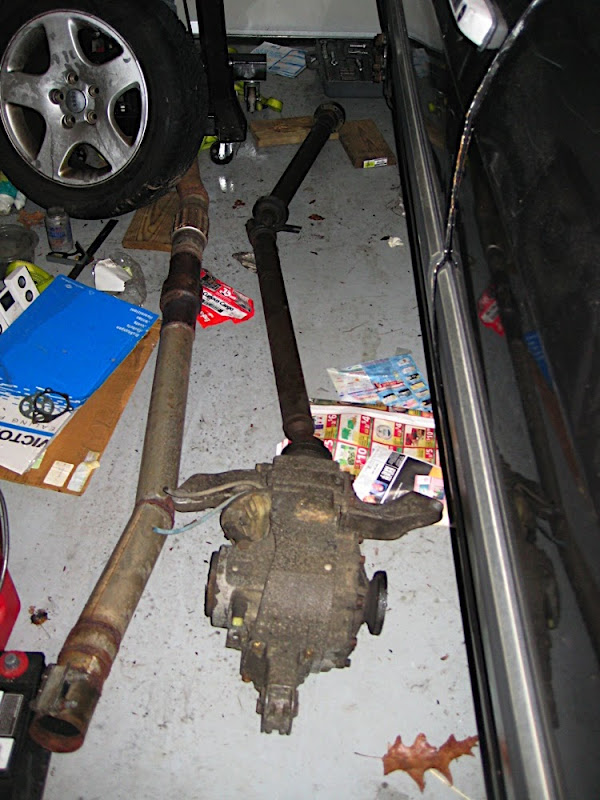
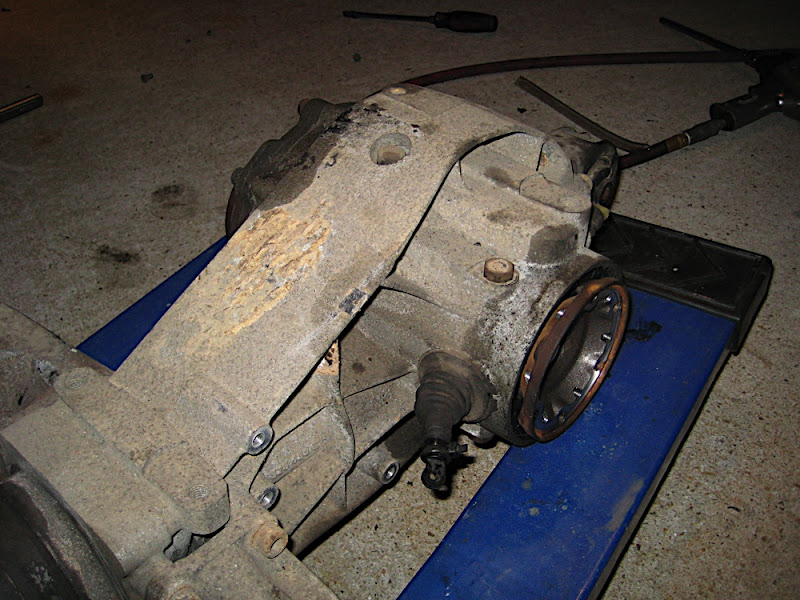
Pulling rear diff from the 4000:
And sitting waiting to get violated:
Last week I spent a very cold and late night on Thursday tearing apart the old locker rear diff on the 4000 so it could accept the V8 rear torsen diff.
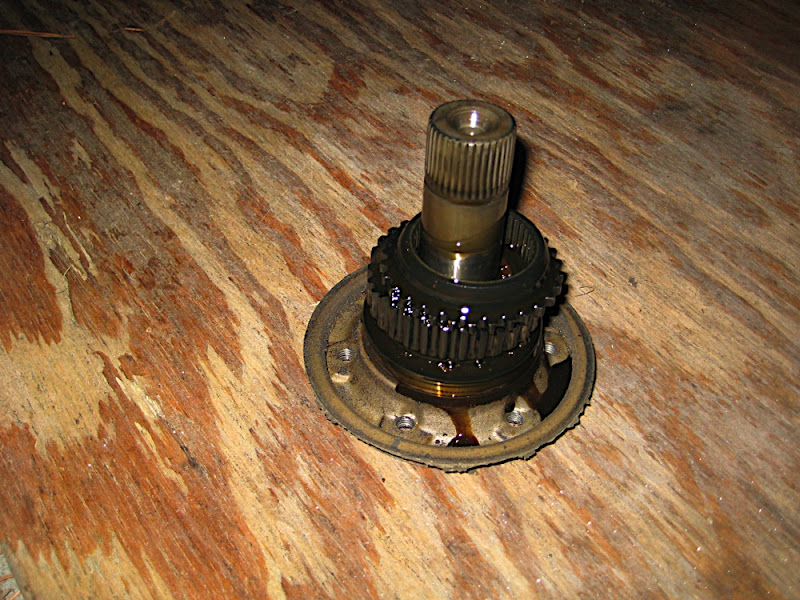
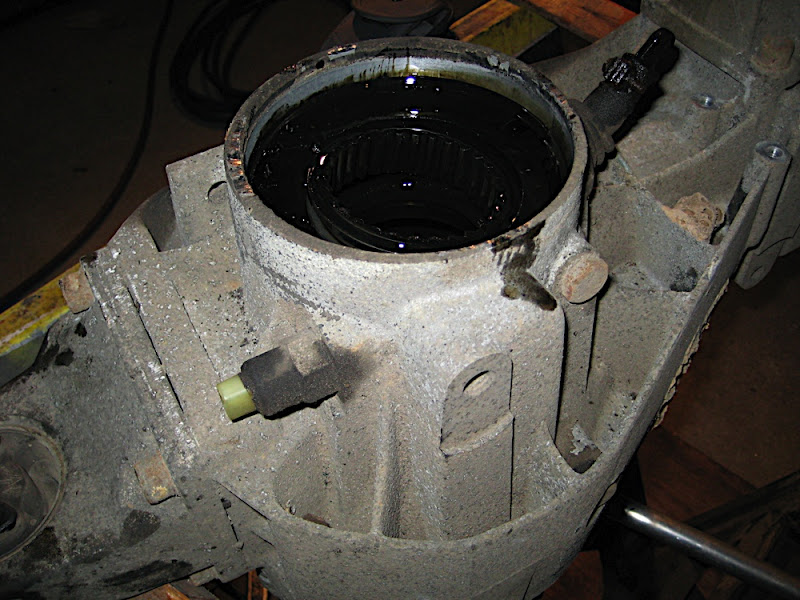
Up and ready to get torn down:
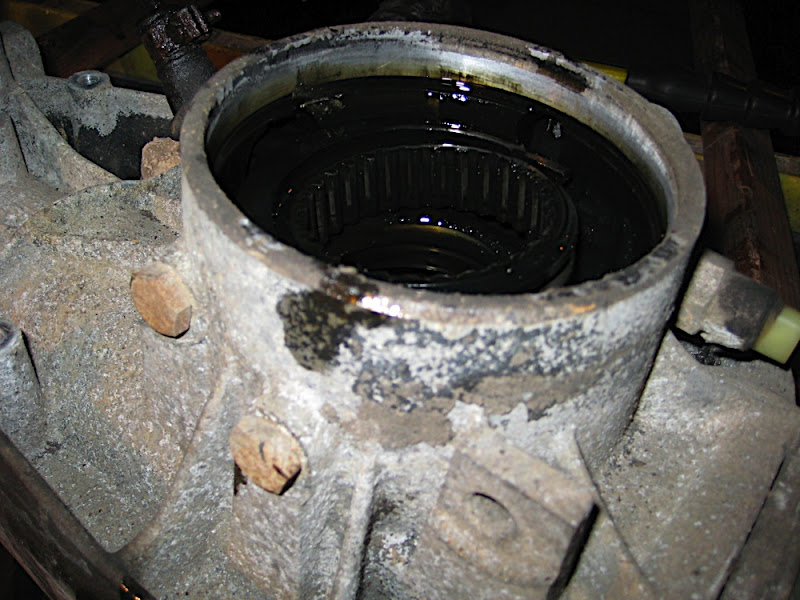
And the locker unit out to clear room for the torsen:
Next on the list was to start making room for the torsen. Since I'll be using the V8 rear axle cups, there's no need for the old 4000 seal... so out it comes:
In order to get the lock collar out, I had to remove three bolts:
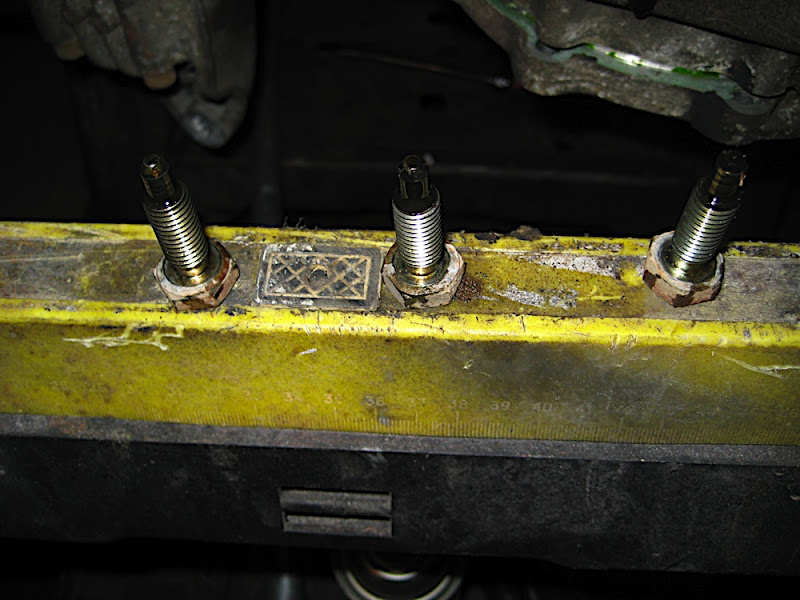
Two were located here:
and one here:
This will allow you to lift the gears out of the rear diff. Make sure you put these bolts back into the housing after everything is out, otherwise it'll leak! These bolts thankfully do not interfere at all w/ the torsen unit, so I didn't need to shorten them at all... which was a plus.
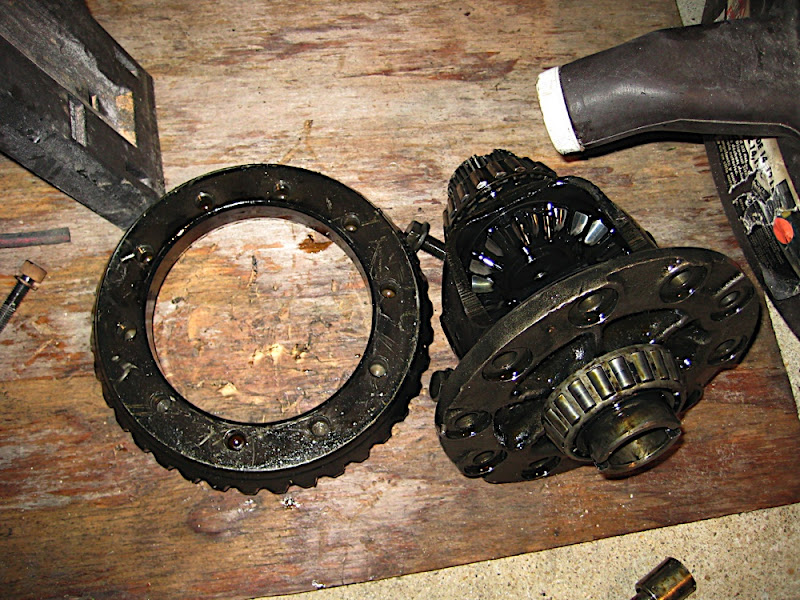
Next on the list was to swap the ring gears on the diffs. The V8 ring/pinion is different than the 4000. This was a little tricky as these pieces are interference fits, so even after the bolts are removed, it's not coming off w/o a fight!
I started off by buzzing off all the bolts w/ my impact gun. I then realized that no matter how I hit the edge of the ring w/ my deadblow hammer, it wasn't moving. So I threaded a few screws in at choice locations and started hammering (while the diff was on a piece of wood mind you!). This gave me a bit of a gap, but the screws weren't long enough to fully disengage the ring from the diff. So I then took a large piece of 3/16" AL I had laying around and stuck it in the gap, and with the other side of the plate resting on my knees I started hammering away. Eventually I was able to free the gear... and success!
I then repeated the same thing w/ the V8 rear diff. It was def easier the 2nd time around w/o a doubt! If I were to do this again (and the hardware store was open) I'd go pick up a half dozen of the same bolt but longer and use that to drive it the rest of the way off. Take that for what its worth.
Next was reassembly, and it's times like these that I fully realize I'm still a bachelor living in my own house . Since this is an interference fit, the way you're suppose to reassemble it is to heat the ring to ~212* (according to Bentley). So since it was below freezing outside, I left the diff out in the garage (to get it to shrink a little) and brought the ring inside and started to bake it (and make it expand) (WARNING: do not attempt if your wife/gf is in the house watching, as she might try to mame you!)
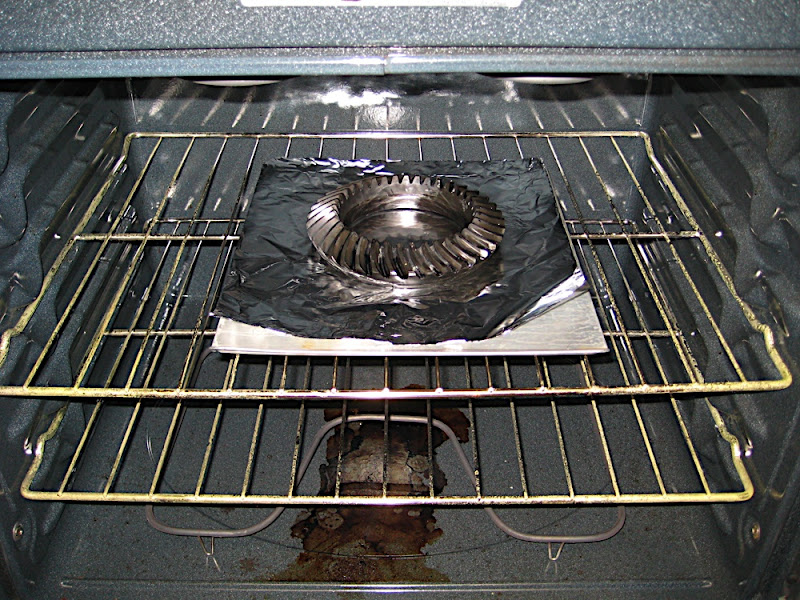
After baking it for about 20 min (wanted to make sure it was good'n hot) I brought the diff into the house and set it up on the stove top. I then tossed on my welding gloves and pulled the ring out and popped 'em together. To my surprise, it literally slipped together! No pushing necessary what so ever! I twisted it until the holes lined up and then ran a couple bolts into it to hold it in place:

Again, do not attempt to do this w/ wife/gf watching you
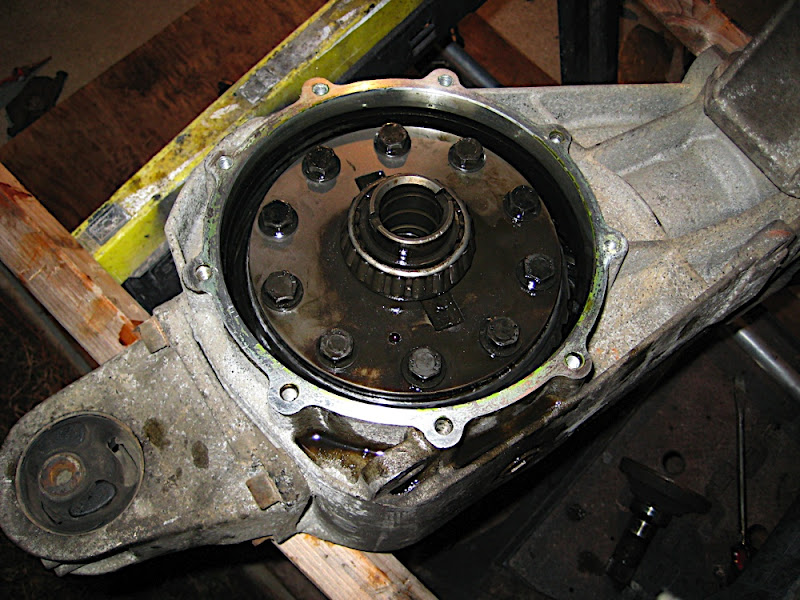
I then torqued down all the bolts to the recommended 66 ftlbs (thanks Austin... found this # after you got it for me. Not sure how I missed it) and tossed her in her new home
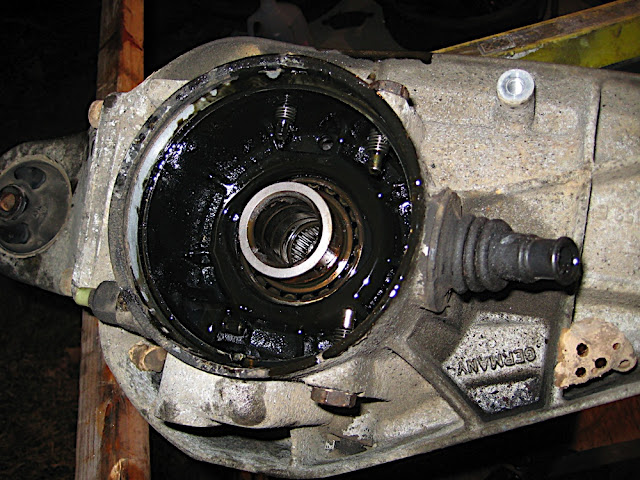
And the other side where the locker used to live:
At this point, I was now waiting on my machinist to finish off the V8 axle cups so I could bolt everything together. After a few day wait, I finally got the call yesterday morning that everything was done!
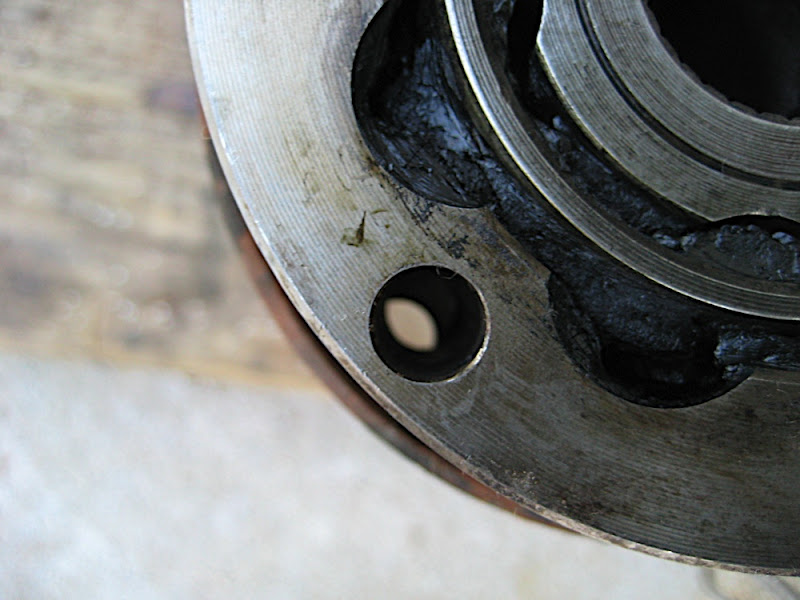
This is what needs to be machined into a V8 axle cup to accept the smaller 4000 inner CV joint:
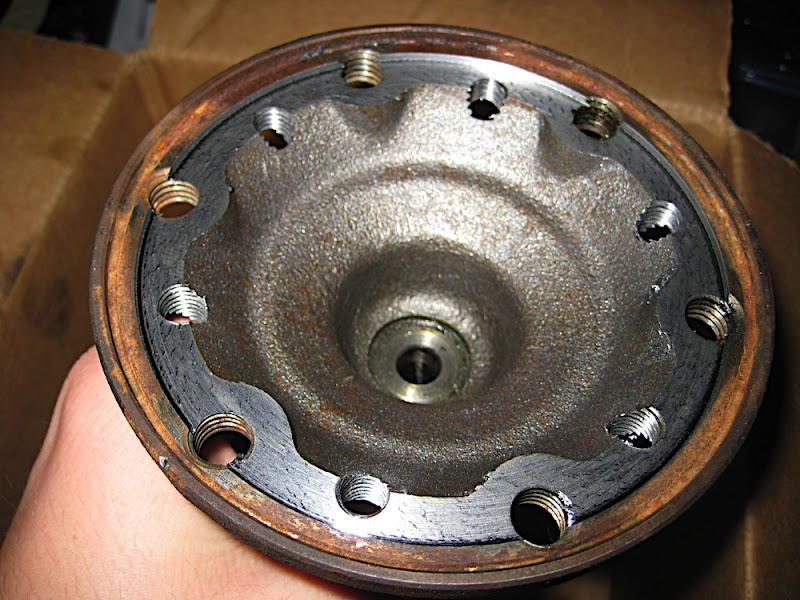
and with CV bolted in place:
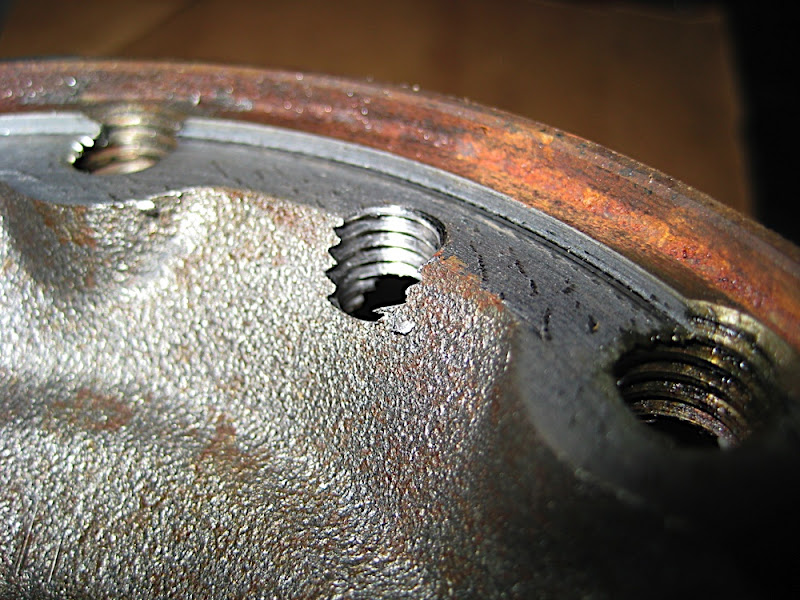
Basically what needs to be done is to machine a lip into the flange to help center the CV joint, and then drill/tap new holes into the material. This isn't nearly as strong as the OEM location, so be careful when torquing down or you're going to strip 'em! I torqued the bolts down a few ftlbs less than recommended to prevent that from happening.
Before finishing off, one more thing to do is to plug the hole where the actuator arm stuck out of the rear diff. I had thought about putting a bolt in there, but that just seemed... ghetto. So instead, I hacked up the arm to the locker as the hole where the boot starts is just too big to plug w/ anything I had around the house.
It started like this:
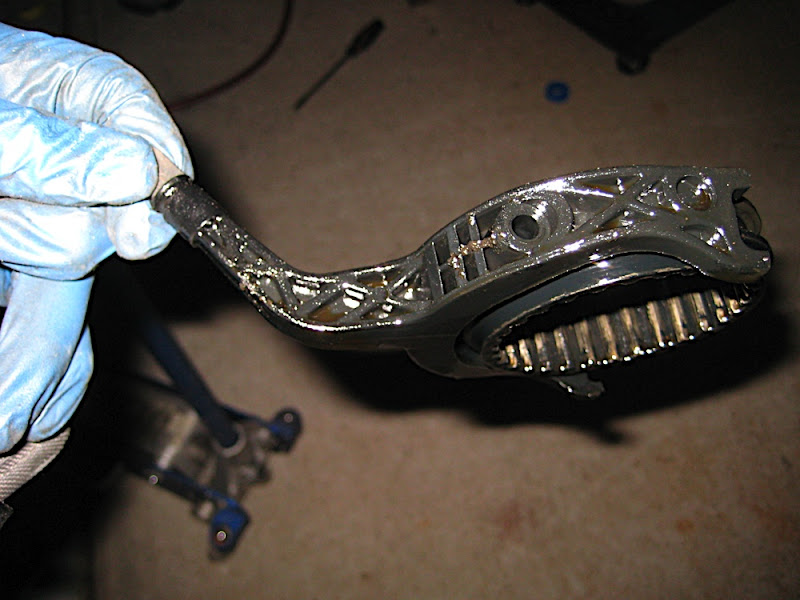
and ended up like this:
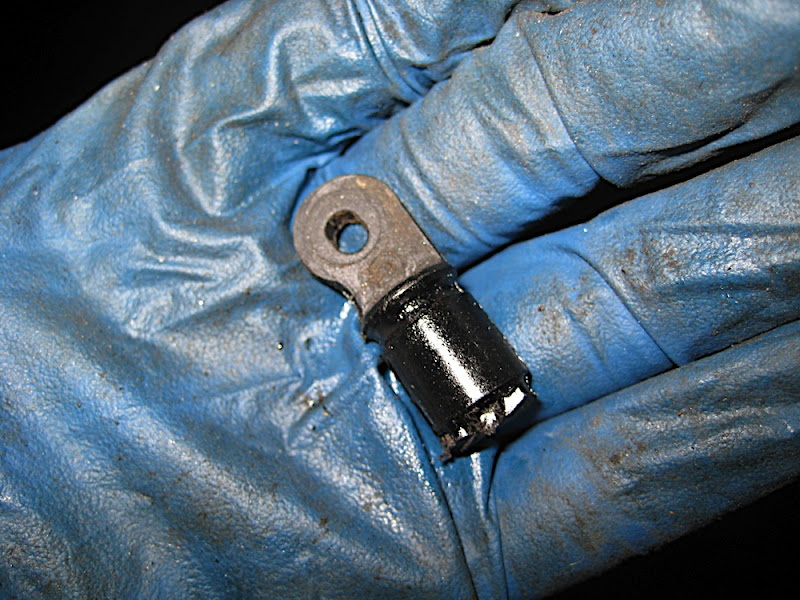
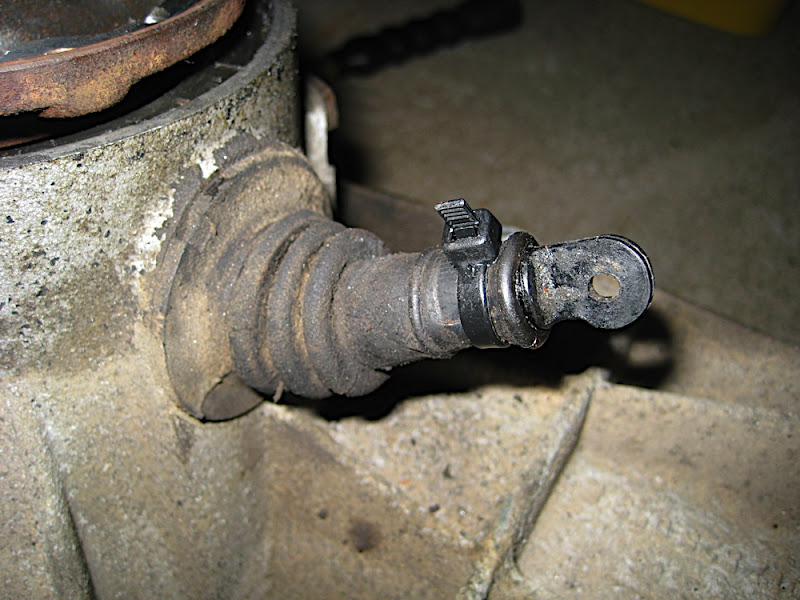
once installed, no one is the wiser... minus the zip tie of course (I ran out of hose clamps, and it was 9-930 before I got this far so everything was closed)
Once that was done, in went the new pass side axle seal, the previously kept driver's side axle seal and the flanges:
and into the car it went! Things bolted up just like normal, but slightly more difficult. Because the lip on the axle flange wasn't as big as OEM, it was a little harder getting the inner CVs to center and stay centered until you put enough bolts in, but def not the end of the world. I'm real happy with the outcome, and can't wait to get this on the ground and ready to go!
Also, during the course of the week I managed to make a new heat shield for the motor mount. My previous plans of using AL plate failed miserably, as there just wasn't the room to do what I wanted to do, and the AL plate wasn't really buying me anything. I ended up just using the AL/Fiberglass insulation I bought and formed it to fit and bolted it to the car... took a helluva lot longer than it should of (won't go into details of what I had to go through before getting to this point), but rest assured it was excessive and had me swearing like a sailor and throwing a few tools.
And the final product:
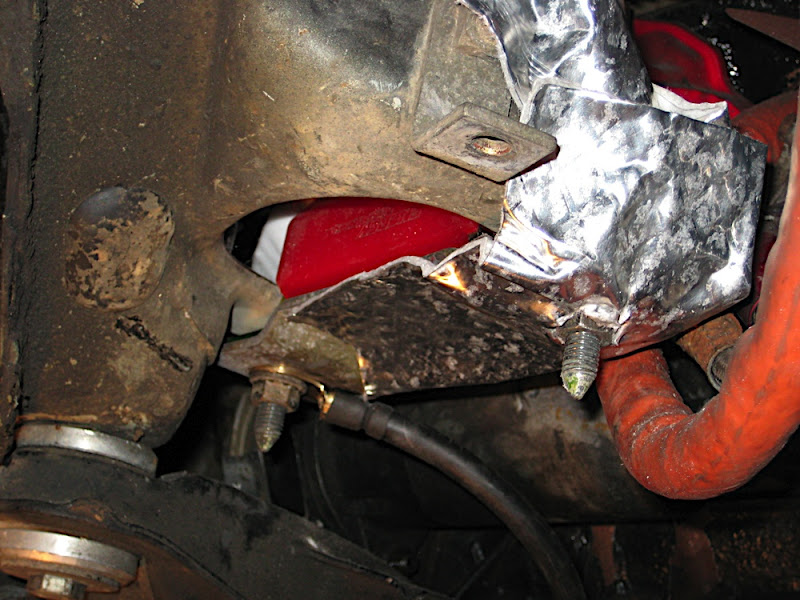
This should protect the mount. The insulation material is rated to 1750*, so that should be MORE than enough to block the radiant heat off the turbo/exhaust manifold.
So that's about it for now! Next step is to refill the fluids and finish up the mounts for the 6 point harnesses and I can finally put the interior back!!! Hopefully in the next 2 weeks the car will be road bound once again!
Over the course of the past month+ I've been planning this swap out and getting things organized. During some free time, I took the time to tear apart the V8 rear diff I picked up mid summer from the local pick and pull ($65 rear diff anyone???
).axle cups out waiting for some machine work
and sweet sweet torsen goodness:
Things you need to save for this swap into the 4000 rear diff:
1) Axle cups
2) Big oil seal. This is in there pretty tight, so carefully get it out. I hit it on the back side w/ a big screwdriver and just kept working my way around until it came out. This can be replaced, but it's BIG $$! So save it if you can
3) Bolts to axle cups
Things that need to be done in order to make the torsen rear diff work in the 4000:
Unfortunately, the V8 rear axle cups are bigger than the 4000 inner CVs, as shown here:
Though it one could say just use the 4000 axle flanges, this isn't an option because they are too short to fit in the V8 rear diff, so there isn't enough spline engagement to work... so the V8 Axle cups needed to get machined... this is covered a little lower in the post.
After doing some research, I finally got the info that I needed as to what machining needed to be done to get this to work (thanks, Nate for sharing the info). During this research I also heard that there might be interferences b/n the cups and the 4000 diff, so I held off bringing these to the machinest until I got the rear diff out to confirm fitment.
So the next logical step was to get the rear diff out of the 4000 and start playing around with it. After getting the motor and such in the car, I went right at getting the rear diff down and out of the car...
Hoping to dismantle as little as possible, I was able to drop the rear subframe enough so that I could just shimmy the rear diff out from the car and not touch the rest of the suspension... thankfully, this worked out as I hoped!
Pulling rear diff from the 4000:
And sitting waiting to get violated:
Last week I spent a very cold and late night on Thursday tearing apart the old locker rear diff on the 4000 so it could accept the V8 rear torsen diff.
Up and ready to get torn down:
And the locker unit out to clear room for the torsen:
Next on the list was to start making room for the torsen. Since I'll be using the V8 rear axle cups, there's no need for the old 4000 seal... so out it comes:
In order to get the lock collar out, I had to remove three bolts:
Two were located here:
and one here:
This will allow you to lift the gears out of the rear diff. Make sure you put these bolts back into the housing after everything is out, otherwise it'll leak! These bolts thankfully do not interfere at all w/ the torsen unit, so I didn't need to shorten them at all... which was a plus.
Next on the list was to swap the ring gears on the diffs. The V8 ring/pinion is different than the 4000. This was a little tricky as these pieces are interference fits, so even after the bolts are removed, it's not coming off w/o a fight!
I started off by buzzing off all the bolts w/ my impact gun. I then realized that no matter how I hit the edge of the ring w/ my deadblow hammer, it wasn't moving. So I threaded a few screws in at choice locations and started hammering (while the diff was on a piece of wood mind you!). This gave me a bit of a gap, but the screws weren't long enough to fully disengage the ring from the diff. So I then took a large piece of 3/16" AL I had laying around and stuck it in the gap, and with the other side of the plate resting on my knees I started hammering away. Eventually I was able to free the gear... and success!
I then repeated the same thing w/ the V8 rear diff. It was def easier the 2nd time around w/o a doubt! If I were to do this again (and the hardware store was open) I'd go pick up a half dozen of the same bolt but longer and use that to drive it the rest of the way off. Take that for what its worth.
Next was reassembly, and it's times like these that I fully realize I'm still a bachelor living in my own house
. Since this is an interference fit, the way you're suppose to reassemble it is to heat the ring to ~212* (according to Bentley). So since it was below freezing outside, I left the diff out in the garage (to get it to shrink a little) and brought the ring inside and started to bake it (and make it expand) (WARNING: do not attempt if your wife/gf is in the house watching, as she might try to mame you!)After baking it for about 20 min (wanted to make sure it was good'n hot) I brought the diff into the house and set it up on the stove top. I then tossed on my welding gloves and pulled the ring out and popped 'em together. To my surprise, it literally slipped together! No pushing necessary what so ever! I twisted it until the holes lined up and then ran a couple bolts into it to hold it in place:
Again, do not attempt to do this w/ wife/gf watching you
I then torqued down all the bolts to the recommended 66 ftlbs (thanks Austin... found this # after you got it for me. Not sure how I missed it) and tossed her in her new home
And the other side where the locker used to live:
At this point, I was now waiting on my machinist to finish off the V8 axle cups so I could bolt everything together. After a few day wait, I finally got the call yesterday morning that everything was done!
This is what needs to be machined into a V8 axle cup to accept the smaller 4000 inner CV joint:
and with CV bolted in place:
Basically what needs to be done is to machine a lip into the flange to help center the CV joint, and then drill/tap new holes into the material. This isn't nearly as strong as the OEM location, so be careful when torquing down or you're going to strip 'em! I torqued the bolts down a few ftlbs less than recommended to prevent that from happening.
Before finishing off, one more thing to do is to plug the hole where the actuator arm stuck out of the rear diff. I had thought about putting a bolt in there, but that just seemed... ghetto. So instead, I hacked up the arm to the locker as the hole where the boot starts is just too big to plug w/ anything I had around the house.
It started like this:
and ended up like this:
once installed, no one is the wiser... minus the zip tie of course (I ran out of hose clamps, and it was 9-930 before I got this far so everything was closed)
Once that was done, in went the new pass side axle seal, the previously kept driver's side axle seal and the flanges:
and into the car it went! Things bolted up just like normal, but slightly more difficult. Because the lip on the axle flange wasn't as big as OEM, it was a little harder getting the inner CVs to center and stay centered until you put enough bolts in, but def not the end of the world. I'm real happy with the outcome, and can't wait to get this on the ground and ready to go!
Also, during the course of the week I managed to make a new heat shield for the motor mount. My previous plans of using AL plate failed miserably, as there just wasn't the room to do what I wanted to do, and the AL plate wasn't really buying me anything. I ended up just using the AL/Fiberglass insulation I bought and formed it to fit and bolted it to the car... took a helluva lot longer than it should of (won't go into details of what I had to go through before getting to this point), but rest assured it was excessive and had me swearing like a sailor and throwing a few tools.
And the final product:
This should protect the mount. The insulation material is rated to 1750*, so that should be MORE than enough to block the radiant heat off the turbo/exhaust manifold.
So that's about it for now! Next step is to refill the fluids and finish up the mounts for the 6 point harnesses and I can finally put the interior back!!! Hopefully in the next 2 weeks the car will be road bound once again!
-
death 4kqt
-
Rocket SLC